
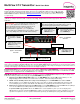
User guide

© 1998-2011 by Magenta Research, LTD., All rights reserved. Magenta Research, LTD, 128 Litchfield Road New Milford, CT 06776 USA
USA: (800) 805-0944 INT: (+1) 860-210-0546 www.magenta-research.com
Document # 5310272-01 Rev-01 (11/8/2011) Page 3 of 3
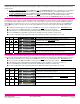
Configuration Mode-2, Video Coupling: Select AC or DC coupling, and DC-restore functions, to be applied to the input video.
(starting in normal-mode) Press and release the CFG button twice to access configuration-mode-2. CFG indicator = flashing.
Press and release the SEL button once. You will now be able to change video-coupling settings.
LED indicators 1-2 should be illuminated (either DIM or ON); all others (indicators 3-8) should be off.
Press the CFG button repeatedly to step through the available video-option settings as shown below.
To leave configuration-mode step through all the options OR leave the buttons untouched for 10 seconds.
LED1 LED2
Front Panel View Video Options Mode
dim dim
Auto-detect AC/DC coupling mode based on input signal.
This is the factory-default
mode.
dim ON
Video-input is DC coupled.
ON dim
Video-input is AC coupled, no DC-restore function.
ON ON
Video-input is AC coupled, DC-restore function enabled.
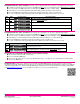
Configuration Mode-2, Video Termination:
Select input video termination to be 75 ohms or high-impedance (Hi-Z).
(starting in normal-mode) Press and release the CFG button twice to access configuration-mode-2. CFG indicator = flashing.
Press and release the SEL button twice. You will now be able to change video-termination settings.
LED indicator 3 should be illuminated (either DIM or ON); all others (indicators 1, 2, 4-8) should be off.
Press the CFG button repeatedly to toggle video termination on/off, as shown below.
To leave configuration-mode step through all the options OR leave the buttons untouched for 10 seconds.
LED3
Front Panel View Video Options Mode
dim
Video input impedance is Hi-Z.
ON
Video-input impedance is 75-ohms. This is the factory-default setting.
To reset all user-configurable options back to factory-default settings:
Disconnect the DC power cable (or AC power).
Press and hold the CFG button.
Connect the DC power cable (or AC power). All LEDs blink 3 times – all settings are now changed back to factory-defaults.
Release the CFG button.
Troubleshooting: In many cases, problems encountered when installing MultiView™ II extension products can be resolved by
checking the CAT5 cable termination. It must be pinned out according to the TIA/EIA 568B standard wiring specification. For additional
troubleshooting information or to obtain the TIA/EIA 568B wiring specifications please refer to the MVII-T4 User Guide, downloadable
from www.magenta-research.com
, or scan the QR-code shown here to access the user guide directly: