
User guide

© 1998-2011 by Magenta Research, LTD., All rights reserved. Magenta Research, LTD, 128 Litchfield Road New Milford, CT 06776 USA
USA: (800) 805-0944 INT: (+1) 860-210-0546 www.magenta-research.com
Document # 5310272-01 Rev-01 (11/8/2011) Page 2 of 3
Changing Internal Settings: In configuration-mode (CFG indicator = on or flashing), the CFG and SEL buttons, plus the LED
indicators (1-8) will allow you to change internal configuration settings. The changes are effective immediately and are saved in non-
volatile memory.
To enter configuration-mode-1
: Press CFG button once. The CFG indicator will turn on, confirming you’re in configuration-
mode-1. Once in this mode, the LED indicators 1-8 will display the current settings as described in the tables below.
To enter configuration-mode-2
: Press CFG button twice. The CFG indicator will flash, confirming you’re in configuration-
mode-2. Once in this mode, the LED indicators 1-8 will display the current settings as described in the tables below.
To exit configuration-mode: Leave the buttons untouched for 10 seconds. The CFG indicator will turn off (normal-mode).
Configuration Mode-1, Sync-mode Options
: The T4 is factory-configured for auto-detecting the proper sync-mode (RepliSync-I
normal/stretched). This mode is generally compatible with all existing MultiView receiver products that support RepliSync (if they are
also using their default settings). However, some video sources may require a custom sync-mode setting (especially at 1080p and
1920x1200 video resolutions). For these cases, one of the other sync-modes can be selected. Note that any connected MultiView
receiver MAY also require a change to its sync-mode settings. Otherwise, you may not get a proper video display output at that
receiver.
(starting in normal-mode) Press and release the CFG button once to access configuration-mode-1. CFG indicator = on.
Press and release the SEL button once. You will now be able to change sync-mode settings.
LED indicators 1-3 should be illuminated (either DIM or ON); all others (indicators 4-8) should be off.
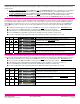
Press the CFG button repeatedly to step through the available sync-mode settings as shown below.
To leave configuration-mode step through all the options OR leave the buttons untouched for 10 seconds.
LED1 LED2 LED3 Front Panel View Sync-mode Setting
dim dim dim
The T4 will auto-detect the required RepliSync-I mode (“normal” or
“stretched”). This is the factory-default
setting.
dim dim ON
Force RepliSync-I normal Horizontal sync. pulse encoding.
dim ON dim Force RepliSync-I “stretched” Horizontal sync. pulse encoding.
dim ON ON
Force RepliSync-II.
ON dim dim
Force fixed-sync mode. NOTE: A connected MultiView receiver must also be in
fixed-sync mode and with H/V polarities selected at the receiver.
Configuration Mode-1, 4
th
Pair Options: The T4 provides several options for using the 4
th
-pair signals (pairs 1-3 are generally
used for video). The factory-default settings support analog audio (L+R summed) on the 4
th
-pair. Note that any connected MultiView
receiver must be configured with a matching 4
th
-pair operating mode. Otherwise, the desired 4
th
-pair signal will not work as expected.
(starting in normal-mode) Press and release the CFG button once to access configuration-mode-1. CFG indicator = on.
Press and release the SEL button twice. You will now be able to change 4
th
-pair option settings.
LED indicators 4-6 should be illuminated (either DIM or ON); all others (indicators 1-3, 7 and 8) should be off.
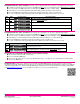
Press the CFG button repeatedly to step through the available 4
th
-pair settings as shown below.
To leave configuration-mode step through all the options OR leave the buttons untouched for 10 seconds.
LED4 LED5 LED6
Front Panel View 4
th
-pair Operating Mode
dim dim dim
4
th
-pair signals are disabled. This effectively “mutes” anything being sent on the 4
th
pair. This can be useful for diagnostic purposes.
dim dim ON
Direct pass-through of 4
th
-pair wires (custom applications).
dim ON dim
External analog (L+R summed) audio. This is the factory-default
mode if no
daughterboard option is installed.
dim ON ON
External S/PDIF digital audio. Input-impedance = 75-ohms.
ON dim dim
Simplex-serial.