
Specifications


56
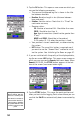
3. After you have selected a point from the list or entered
coordinates manually, the ProMark3 RTK switches to the
compass screen. The arrow indicates the direction in
which you are currently walking and the
symbol indi-
cates the direction to the stakeout point.
4. Change direction, and walk slowly, in order to align the
arrow with the stakeout point. When you walk in the right
direction, you’ll see that the arrow is vertical and the
stakeout point at the top of the compass. When the dis
-
tance to the point is only about one meter, the screen
automatically displays the following:
NOTE: You can return to the compass screen by pressing the NAV key. Con-
versely, when the default screen is the compass screen, you can display the
above screen by pressing NAV.
5. Check the distances displayed at the top of the screen.
Move the pole slowly to zero these values (see diagram
above left). Carefully plumb the pole for precise staking.
The displayed distances should be interpreted as follows:
• East 0.233 M means you must move east to zero this
value.
• North 0.367 M means you must move north to zero
this value.
6. When these values are all zero, stop moving. You are on
the point.
7. Set the stake.
8. You may want to take another reading to save the as-
staked position. Obviously, this position should be the
same as that of the stakeout point but later you can com
-
pare your field work with the target coordinates.
East
Distance
North
Distance
Target Point
0, 0
E
N