
Specifications


54
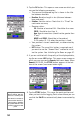
3. Tap the OK button. This opens a new screen on which you
can see the following parameters:
• The name of the opened log file is shown in the title
bar between brackets.
• Baseline: Baseline length
• Solution: Solution status. Check that is “Fixed” (for
centimeter accuracy).
• Receiver status:
SV: Number of received SVs. Should be 6 or more.
PDOP: Should be less than 3.
Age: Age of corrections (should not be greater than
2 sec).
HRMS and VRMS: Should be in the order of
0.03 meters (0.1 ft) when the position is fixed.
• Your position’s current coordinates, as determined by
the system.
• INIT button: The use of this button is required now if
you want to use the “Known Point” method to initial
-
ize the system. See Initializing the Rover on page 42.
4. Tap the START button to start logging the trajectory.
5. Walk along the trajectory and let the system operate on its
own. You can see that the
Site ID is automatically incre-
mented as you walk. Note that using the PAUSE button,
you can pause the position logging if you need to do so.
6. When you have reached the end of the trajectory, tap the
DONE button. This closes the open log file, which now
contains the positions of all the logged points along the
trajectory, and takes you back to the last displayed naviga
-
tion screen.