
Specifications


52
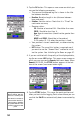
3. Tap the OK button. This opens a new screen on which you
can see the following parameters:
• The name of the opened log file is shown in the title
bar between brackets.
• Baseline: Baseline length in km (distance between
base and rover).
• Solution: Solution status. Check that it is “Fixed” for
centimeter accuracy.
• Receiver status:
SV: Number of received SVs. Should be 6 or more.
PDOP: Should be less than 3.
Age: Age of corrections (should not be greater than
2 sec).
HRMS and VRMS: Should be in the order of
0.03 meters (0.1 ft) when the position is fixed.
• Your position’s current coordinates, as determined by
the system.
• INIT button: The use of this button is required now if
you want to use the “Known Point” method to initial
-
ize the system. See Initializing the Rover on page 42.
4. If you are satisfied with the quality of the displayed data,
tap the on-screen
LOG button. This opens a new screen on
which you can now see the
Remain field count down. When
Remain=00:00:00, the STORE button appears at the bot-
tom of the screen (see screen below right).
5. Tap the STORE button. This saves the point position and
takes you back to the Logging Point screen where you can
see that the
Site ID has automatically been incremented by
one.
If the point you save has a
“Fixed” solution, then it is
stored as a control point.
This means it can later be
selected from the list of
control points to initialize
the system with the rover
precisely located over this
point.