
Specifications


144
Select either On or Off for each screen until you see the Setup
menu once more. Note that you must cycle through all the
screens in order to put your selections into effect.
The following is a description of each of the navigation
screens.
Map Screen
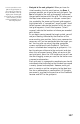
The Map screen shows a map of the area surrounding your cur-
rent location. Use the IN and OUT buttons to adjust the scale.
The Map screen is always in the Position mode when you ac-
cess this screen. In this mode, your present position is indi-
cated by the large arrow icon in the center of the display. If
you are moving, the arrow will point in the direction that you
are heading. At the bottom of the screen is the scale for the
map displayed and two data fields that can be customized, or
turned off, depending upon your needs.
The present position icon will change to an hourglass when
the ProMark3 is unable to compute a position fix due to poor
signal reception.
Tap anywhere on the Map screen or press any of the arrow keys
to switch to the Cursor mode. In this mode, you are provided
with a cross hair cursor that can be moved using the stylus
(you tap directly where you would like the cursor to be) or, for
a step-by-step move, by using the arrow keys.
At the bottom of the display is the information for the position
of the cursor relative to your present position (heading and
distance). Also any points of interest or GIS features that the
cursor is over will be shown.
To return to the Position mode, press ESC. The cursor will dis-
appear and the present position icon will appear centered on
the map.
Waypoints and control points are represented on the map
screen using the following symbols:
Symbol Point Type Comment
Control Point Uploaded from GNSS Solutions.
Control Point
Created during post-process survey per-
formed in static or stop&go mode.
Waypoint
• Uploaded from GNSS Solutions or
MobileMapper Office.
• Default symbol used when created with
ProMark3’s Mark function.
Map screen in Position
mode
Map screen in Cursor mode