
Specifications


143
8. Navigation
ProMark3 offers very helpful navigation functions that you can
use while performing your field operations, whether Surveying
or Mobile Mapping.
The present chapter tells you how to use the navigation
screens, how to create waypoints and how to work with the
GOTO and Routes functions.
Navigation Screens
ProMark3 of-
fers 7 different
navigation
screens to help
you locate your
-
self or navigate
to waypoints or
GIS features in
an existing job.
From any dis
-
played screen,
simply press
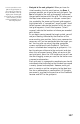
the NAV button to access the last-used navigation screen. To
display the next navigation screen, press NAV again. The se
-
quence of navigation screens is as shown above. It can be
scrolled in the reverse direction by pressing ESC once any of
these navigation screens is displayed.
You may find that you do not regularly use all of these screens.
To make it faster to move among those screens that you do
use, you may turn off individual navigation screens (except
the Map and Satellite Status screens) by pressing the MENU
button, selecting the Setup option and then the Nav Screens
option.
Press NAV
Position Screen 2
Large Data Screen
Compass Screen
Map Screen
Satellite Status Screen
Speedometer Screen
Data Screen
Road Screen
Position Screen 1
Press NAV
etc.
You will be able to view the
different navigation
screens only after launch-
ing the Surveying or
MobileMapping applica-
tion.
The Map screen has two
modes: Position and Cur-
sor. Using the stylus, tap
anywhere on the map, or
press any arrow key, to
select Cursor mode. Press
ESC to return to Position
mode.
When a Position screen is
displayed, press the Left or
Right arrow key to display
the other. Press this key
again to return to the previ-
ous screen.
Except for the Satellite
Status screen, all naviga-
tion screens can be cus-
tomized.