
Specifications


137
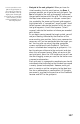
- Navigate to the next grid point: When you have fin-
ished recording the first point feature, tap Done. A
message prompts you to go to the next grid point. Tap
Yes to navigate to the next grid waypoint and record
the next point feature within the grid. This takes you to
the Map screen where you can see your current posi
-
tion marked by the arrow and the next grid waypoint
highlighted with a “crossed box” target symbol. Small
hollow squares indicate the locations of all the unvis
-
ited grid waypoints. Small filled squares (“black”
squares) indicate the locations of where you recorded
point feature.
As you begin moving toward the target symbol, you will
see your heading indicated by the direction of the
arrow marking your position. Adjust your movement as
necessary until you are positioned over the target sym
-
bol. You may also use any of the other navigation
screens available with your ProMark3. The Arrival
alarm is disabled when navigating to grid points. It is
best to note your distance to the next point and stop
when this value goes to zero. When you arrive at the
next grid point, press the LOG button and you will see
the same Logging screen you used for the earlier mea
-
surement or observation.
Each grid point is a geographic coordinate you should
make every effort to occupy so that the data you record
is evenly spaced and complete. However, each grid
point is merely an aid for navigating to the ideal loca
-
tion for an observation or measurement. All the data
you record is ascribed to the position of the ProMark3
receiver and NOT to the grid point.
It is also possible to navi-
gate to any grid point (or
any location for that mat-
ter) on the Map screen by
tapping over another grid
point. After you record data
at this location, you will
still be prompted to go to
the next grid point .