MAGELLAN MSS - Mobile Satellite Internet System SYSTEM ACTIVATION MANUAL For Internal Use Only Updated 6-13-05 1
Table of Contents PRE-INSTALLATION – BEFORE THE INSTALL ...................................................................... 3 1. OBTAINING A “SAN & PIN” NUMBER............................................................ 3 2. WHAT YOU NEED FROM THE CUSTOMER IF THEY LEAVE ........ 4 3. SETTING UP THE INSTALLERS LAPTOP...................................................... 4 SYSTEM ACTIVATION ...................................................................................................................
INTRODUCTION The Ground Control MAGELLAN MSS is a self-contained automatic pointing mobile Wi-Fi hot-spot satellite Internet network system. Try saying that three times fast. If you’re reading this manual, you’ve probably just physically installed the MAGELLAN and want to activate the system so that it may connect to the Internet at the touch of a button.
2. WHAT YOU NEED FROM THE CUSTOMER IF THEY LEAVE Most of the time, the customer will not be present when you are doing the bulk of your work. Because of this, you will absolutely need some things from them. • Keys to the Rig (in case you have to move it). • How to turn on and off power in the Rig (lights too) • The password (if any) to their computer system. • Their cell phone number. If they do not have a cell phone, it is wise to provide them one. 3.
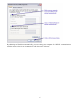
Make sure that you click on the box that allows you to see your current network connection. Doubleclicking on the task bar icon opens up the “Network Connections” window you open up from the control panel earlier. Double-clicking on the “Internet Protocol (TCP/IP) option opens up the window below.
By obtaining an IP address automatically, you are setting your computer for “DHCP” communication with the router so that it can communicate with the router with ease.
SYSTEM ACTIVATION STEP 1 - CHECK ALL CONNECTIONS Make sure all of your wires are connected properly from the MAGELLAN Hardware Installation. Below is a schematic of a correctly connected MAGELLAN system. There are 5 cables that come down from the MAGELLAN that connect to 3 different components. 1. 2. 3. 4. 5. The RX Coax Cable that connects to the DW6000 Modem The TX Coax Cable that connects to the DW6000 Modem. The Ethernet Cable that connects to the Router (Port 1-4).
The DW6000 Direcway Modems will supply the Internet connection to the Linksys Router. A standard Ethernet cable runs from the single Ethernet port on the back of the DW6000 to the “Internet” port on the back of the Router. The Ethernet cable from the dish is used for communication and is connected to one of the Routers 4 ports. The dish communicates with the DW6000 modems as well as gives any connected computer access to the MAGELLAN Administrative screen.
STEP 3 – PLUG INSTALLER LAPTOP INTO ROUTER Use a standard Ethernet cable to connect your laptop to any of the 4 Router ports. Note the task bar status window of your network connection will show that your computer is connected to the router. If you double click on this task bar icon, you will get the Local Area Connection Status window, as seen below.
Open a browser and type in 192.168.1.2 on the Address line to access the MAGELLAN Administrative Screen. The MAGELLAN Administrative Screen will appear. (If it does not appear, check that all cables are connected, reboot everything and try again). For an explanation of the MAGELLAN Administrative Screen, please visit APPENDIX A of this manual. TRICK - REMOVING THE ANNOYING CLICKING ON REFRESH – The MAGELLAN Main screen is constantly refreshing itself and this makes an annoying clicking sound.
Click on Compass Calibration Then enter in the vehicle heading Once you click on “Save Settings” the dish will move about for about 6 to 10 minutes and then “Finish” the calibration. The dish will not stow after the dish compass has calibrated. After the calibration, the Vehicle Heading of the Administrative window should match (within 1-2 degrees) the vehicle heading you entered. That’s it for compass calibration… You do not need to move the vehicle.
COMMISSIONED MODEMS - If the modems you have are already commissioned, you may simply press “Find Satellite” on the Administrative Screen and skip the rest of this step entirely. The MAGELLAN will automatically point the dish and Auto Cross Pol the to the commissioning state of the DW6000. This is a great feature for those who want to have two DW6000 modems commissioned on different satellites, a great backup feature! Simply swap out the modem, and reboot the whole system.
• 1308_17K, 1070_6K, 1230_14K, 1350_20K… are the transponders. Note how most satellites have more than one transponder for that satellite. Select any transponder. You must press on the “CALCULATE” button to record your selection. The main screen will automatically appear. Now click on “Find Satellite”. You can watch the Azimuth, Elevation and Skew angles change in the admin window. The dish should find the satellite and perform and pass a “cross pol” in about 3 to 7 minutes.
Click on “Registration – Installer”. Make sure you do not use “Registration – User” in this installation, or you will have to decommission the entire system which takes over 24 hours to perform. Enter your Zip Code, or check the box next to “Enter Location Manually” if you know the latitude and longitude of the dish. It is important to have correct information for the zip code because this affects the timing of the dish. If timing is not accurate, the satellite system will not work for commissioning.
Verify the address is correct, and click on “Next”. Select the satellite, and one of the transponders with that satellite. Below is a chart that shows the longitudes of each of the satellites. In this case, since we locked on satellite on G4R (Satellite 99) transponder 1350_20K from the previous step, we’ll choose that same transponder here, and then click on the “Next” button. (Note that it does not matter which transponder you use as long as it is on the satellite you are connected with).
Verify the above screen is correct (which it should be) and then click on “Next”. The MAGELLAN should have already passed cross pol when it locked on satellite.
On the above screen, you will need to click on the drop down menu and select “SOHO_VAR_Registration”. Ground Control is a Business Class VAR of Direcway. Click on “Next” when this has been selected. This status screen shows the progress of the DW6000 modem as it connects to the registration server. Once it has completed, click on the “Next” button. This warning message pops up and states that the registration process will sometimes take a few minutes. Click on OK.
This pop up window above may appear… click on Yes to proceed. The bottom of the browser window will show that you must wait for the registration server to communicate with the DW6000 modems. The subscriber agreement appears. Have the customer read this page and click on the “I Agree” button on the bottom of this page.
Enter the SAN and PIN number supplied to you by Ground Control and then press on “Continue”. This screen above shows that the SAN and PIN was recognized as this customer. Make sure that the name in this window matches the name of the customer you are commissioning. If not, contact Ground Control technical support. Click on “Continue” to advance to the screen below. The Site ID is the Direcway Commissing number for this customer. The Terminal IP address is the address of the Direcway modem.
STEP 8 – TESTING YOUR INTERNET CONNECTION If all goes well, you should be able to start surfing right now. In some cases, you’ll need to reboot the whole system, and press on “Find Satellite” again. This is the case if you’ve commissioned on a different satellite from the one that you wish to use for your Internet connection. Try bringing up a web page right now… Now, let’s look at the Direcway DW6000 Administration Screen: Type in http://192.168.0.
SYSTEM INFO Many times you will want to know the SITE ID and IRU Serial number to a DW6000 system… To do this, click on the “SYSTEM INFO” button on the Main DW6000 Administration screen. (URL 192.168.0.1). SITE ID - The Site ID is created upon commissioning the Direcway modem and represents the customer’s active account on Direcway. The IRU is simply the serial number of the Direcway Modem. The Site ID and Serial number can be found on this screen along with numerous other information.
STEP 9 – CONFIGURING EMAIL ACCOUNTS Now that you’re online, you (or your customer) may access information on configuring email program. Instructions for configuring you email accounts may be found at: http://www.groundcontrol.com/support.htm There are several FLASH programs that will easily guide you through this process.
The router administrative screen defaults to the “Setup” menu option on the “Basic Setup” screen. There is no need to change anything on this screen if you are doing a standard DHCP install. Make sure the “Local IP Address” is 192.168.1.1 (sometimes the router is not defaulted at this number). TURNING OFF WI-FI Many customers will want the ability to create a Wi-Fi Hot-Spot for connecting their computer to the MAGELLAN system from anywhere inside (or outside) the vehicle.
NAMING YOUR WI-FI CONNECTION You will want to name your Wireless Access Point. The name you choose for your access point will broadcasted and will be displayed to a client computer locating a wireless network to connect to. NOTE – You may choose one of eleven channels. The standard channel out of the box is 6. Use the pull down window to select a different channel. This action will not hide your network from view to those on different channels.
ENABLE SECURITY ON WI-FI You have the option of password protecting the customer’s Wi-Fi connection from being accessed by outsiders. If you do not set security on the Wi-Fi network, anyone may connect to it with ease. To set security, follow the screen below.
Write Down the Passwords for later use, or copy and paste them to a document or text file for cutting and pasting later. Remember, these passwords are only for those who want to connect to the Wi-Fi router. If you forget the passwords, you’ll need to directly connect to the Wi-Fi router with an Ethernet cable. CONNECTING TO THE WI-FI ACCESS POINT Okay, so let’s test to make sure the Wi-Fi network is working. You will need to have a wireless access card for your laptop or customer computer.
The Wireless Network Connection screen will list ALL available Wi-Fi connections you may connect to. In this case, there are two networks to choose from. Notice that CICWIRELESS is Unsecured, and you may log into it without a password. We named our Access Point “MyMobileNet” so this is the network you will connect to. Simply double click on the box to bring up a password screen seen below.
If the access password is correct, you will be connected to the access point as shown below. Make sure that you type in the password which is CaSE SeNSiTiVe. We recommend that you cut and paste in the password and save it to a text file that you can email the customer. Now if the Direcway dish is up and online, simply open a browser and start surfing the Internet. If you are not online, open up the Linksys Administrative window to see if you are able to access it. (192.168.1.
The remote behaves identically to the MAGELLAN Interface screen, and it has an additional button to turn remote power on and off. TURNING POWER ON – To turn power on from the remote, press the power button and the green light will appear in 1 or 2 seconds…Other lights will blink for anywhere from a few seconds to 80 or 90 seconds if the Direcway modems are booting up. When they stop, you may click on one of the other buttons. There are 4 buttons… Power, Find Satellite, Stow Dish and Stop.
APPENDIX A – Explanation of the MAGELLAN Main Screen BETA ADMIN SCREEN The MAGELLAN Administrative panel may be reached from any connected computer by typing in 192.168.1.2 on any browser. On the above screen, the Direcway DW6000 modems shows a Signal Quality of 11 (11 is offline… 31 or higher is online and connected to the correct Direcway Satellite.
WINDOW - INPUT DATA GPS – The Input Data window shows that GPS has been acquired. (The GPS Antenna is located inside of the Direcway Dish LNB cover at the end of the dish arm). It sometimes takes a minute for GPS to be read after the dish is booted. Vehicle Heading – The magnetic direction the vehicle is headed. The screen above shows a magnetic heading of 117.3 degrees. This should be close to a handheld compass.
These override controls are not normally used in the commissioning of a MAGELLAN. WINDOW - STATUS The Status Window is a great resource to troubleshoot your system if problems occur. TX:6 RX:3 – This is the actual status of the DW6000 modems. For a list of what TX and RX stats codes means, visit APPENDIX B Version – This shows the current flash programming the MAGELLAN is using.
Note how the DW6000 window on the same screen as the MAGELLAN Interface Screen. You may bring up the DW6000 screen on a different browser window. Simply type in 192.168.0.1 to access this screen. INSTALLER TRICK Add these links to your browsers “FAVORITES” Menu so you an easily access these screen with a simple hyperlink in your favorites list. * 192.168.1.1 - Linksys Router Administrative Screen * 192.168.1.2 - MAGELLAN Administrative Screen * 192.168.0.1 - Direcway Main Administrative Screen 192.168.0.
You do not need to move the rig in order to calibrate the compass. Also, the compass will learn over time to become more accurate. When you save this setting, the dish will perform a compass calibration, which will move the dish and take couple of minutes. The dish will not stow after it performs a calibration.
8 operation The transmitter is available 9 The transmitter is adjusting for optimal network timing 10 The transmitter is unable to communicate with the Network Operations Center 11 The transmitter is not available because the receiver software is out of date 12 The transmitter is not receiving network control messages from the Network Operations Center The transmitter is unable to 13 This is the normal operational state and indicates that the transmitter is ready to transmit data.
transmit pointing test 19 The transmitter is queued for a transmit pointing test 20 The transmitter is performing a transmit pointing test 21 The transmitter is disabled because a transmit pointing test failed 22 The transmitter is disabled pending a transmit pointing test 23 The transmitter is disabled because a transmit pointing test cannot be performed program on the installation computer requests that the transmitter perform a transmit pointing test.
improves. This condition can also indicate that the IRU is unable to receive the signal from the NOC. This is also associated with a signal level less than 30. This occurs if there is a weather outage at the user location, a NOC outage due to inclement weather or other reasons, a misaligned or faulty antenna, or faulty cabling. If this keeps happening under normal weather conditions, make sure the power supply is correct. The power supply should be Part # 1031105-0001.
Okay… Making sure your computer is connected to the router, type in 192.168.0.1 to bring up the Main Direcway Status Screen Click on “System Status”… The below screen will appear: On this screen, signal strength is 50, which means we are on the correct satellite. (Anything over 31 is on the correct satellite). If you are curious as to what TX Codes 7 and RX Codes 5 are, please review APPENDIX B. Note that this screen shows an uncommissioned set of modems.
Click on “Antenna Pointing”, to advance to the next screen: Click on “Next” to bring up the screen below (there is no need to check OPI). Click on “Perform ACP”, and then click on “Next”.
This is the main ACP window that allows you to do 2 different kinds of Cross Pol Routines. AUTOMATIC – This test is PASS or FAIL. If you pass, you are fully cross poled and if your modem is commissioned, you may start surfing on the internet (normally in 10 to 20 seconds). You may run this test as often as you like. You only need to PASS once to be successful, but the dish will not pass if it is not skewed properely.
Clicking on Manual Movements will make the screen below appear: The blue buttons (top right and top left, pointing diagonally down) allow you to rotate skew one direction or the other. The Signal Quality Meter will change to an Isolation meter when you run the MANUAL test. Note that the Skew Step size is .5 degrees, which is fine for now… You may wish to enter 0.2 degrees for even finer control of the skew rotation. When you move skew, the angle of the skew will change. The Skew angle is shown as “SK: -26.
Clicking on Manual makes a small POP up window appear: This is a safety warning to protect installers from standing in front of the dish during an installation. The danger zone on a satellite dish is between the LNB and the dish face. Be sure this area is clear at all times. Click on Continue, and the window below appears: The screen on the right shows a real time isolation reading of your skew. This isolation reading is also displayed on the MAGELLAN manual motor control screen.
Here is the fun part… you want to move the skew of the dish by clicking on the skew buttons until you gain your highest isolation reading. (Sometimes, the meter will show that you are of a PASSING level. If you see the “PASS” appear (and stay) on the screen during the manual test (as seen below), you may stop the test and run the AUTOMATIC test to (hopefully) gain your PASS and finish the Cross Pol.
Clicking on Automatic bring up the Pop-Up window below: The window on the right will appear, and if all goes, well, you’ll get the window on the right in a few seconds. Congratulations… You’ve passed cross pol. Simply click on “Close” and start surfing the web. If you get a “FAIL”… try re-running the Automatic test several times. If you still can’t get on, then you’ll have to either tweak the satellite dish motors, or change transponders.
APPENDIX G – SPECIFICATIONS MAGELLAN SPECIFICATIONS BANDWIDTH SERVICE (Via Direcway) Download Speed…………………….. Normally 400 to 1500 Kbps Upload Speed…….………………….. Normally 30 to 100 Kbps Public IP Address……………………. Optional Protocol………………………………. TDMA VOIP Phone Service………………… Included SATELLITE DISH Satellite Acquire Time (from stowed).. Automated Cross Poll acquisition…… Reflector Type……………………….. Mount Geometry…………………….. Polarization…………………………... Deployment Sensors………………….