
User manual


6
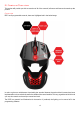
Both the palm rest and control module simply click to the chassis. To remove the palm rest, hold the chassis in
one hand whilst gripping the palm rest and lift up until it unclips. When re-attaching to the chassis, make sure
the round bar lines up with one of the channels and then press down firmly. To remove the control module,
again, start by gripping the chassis in one hand. With the other, place your thumb at the back of the module
with your fingers gripping the front. Then lift the module out whilst applying force to the chassis in the opposite
direction. The module will then unclip allowing you to angle it up and out of the chassis.
The RAT1 is also the first Mad Catz product to ship that also allows its users to customize the product further
with 3D printing. At launch we have made available the 3D data files for the product’s palm rest. These files
are intended for use by members of the public who are familiar with CAD software and 3D printing. Get your
3D files from www.madcatz.com/downloads.
Printing Existing Parts (STL files)
If you do not have access to your own 3D printer, we recommend the following sites:
shapeways.com
thingiverse.com
sculpteo.com
cubify.com
i.materialise.com
We recommend the following print materials:
Polycarbonate (PC)
Any suitable metal
Any recommended material from the above sites that is suitably tough
Designing your own part (using the RAT1 Attachment.STEP file)
Experience in the following software applications is required.
SolidWorks
AutoDesk Alias
Rhino
The part that clips into the RAT1 Chassis should remain unchanged. The surfaces can be used as a foundation
for your design. Parts will have to be exported as an STL file to the 3D printers' recommended requirements.