
User`s guide


QuickStream DV - Portable FireWire Hard Disk DV Recorder - 8
snap.
3. To release, rotate the QuickStream DV to a horizontal position and
depress the belt clip near the bottom and slide the QuickStream DV
upwards and out.
Because the QuickStream DV incorporates an industry standard 1/4-20 mounting
screw-hole, there are many other mounting options available on the market. See
the particular instructions that accompany those mounting options to properly
mount the QuickStream DV. Always be sure never to insert the threaded screw
into the 1/4-20 screw-hole of the QuickStream DV too far in order to prevent
damage to the QuickStream DV.
Connecting the QuickStream DV to the FireWire/IEEE1394/i.LINK port of
your DV Camcorder
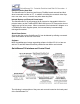
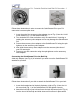
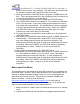
The QuickStream DV has a 6 pin FireWire connector builit in (see Fig. 5). Using
the included 6 pin to 4 pin FireWire cable connect the 6 pin FireWire connector of
the QuickStream DV to the 4 pin FireWire/IEEE1394/i.LINK connector on your
DV camcorder (Fig. 6).
Fig. 5 Fig. 6
Selecting the Recorded File Format
The QuickStream DV ships from the factory preset to record DV in the
QuickTime (.mov) file format. If your video editing program utilizes the Quicktime
(.mov) file format (e.g. Apple Final Cut Pro/Express, QuickTime Pro, etc.) then
this is the file format you require. To instruct the QuickStream DV to record in a
different file format follow the instructions below:
1. Make sure the QuickStream DV is plugged into AC power using the
supplied AC power adapter and that the “MASTER” power switch on the
QuickStream DV is in the “ON” position.
2. Turn on the QuickStream DV by pressing the “POWER” button.
3. In a moment, both “POWER” and “RECORD” lights on the QuickStream
DV will flash simultaneously. This indicates that the drive is ready.
4. At this point, we will enter the QuickStream DV’s “File Format
Specification” mode. We do this by pressing and holding the “RECORD”