
User Guide


Working with files 47
2 While you are working on a file, Auto-Backup creates a backup file with the
following name convention: filename + an incremented 3 digit number + the file
extension; for example, myfile000.htm.
3 If the application closes abnormally, when you restart the application,
Auto-Backup opens all of the open files that were saved by Timed Backup.
If Timed Backup is not enabled and the application closes abnormally, you can
open the last backup version of a lost file from the backup location.
4 When the original file is saved, or when the application closes normally,
Auto-Backup deletes a Timed Backup file.
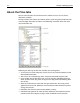
Configuring Auto-Backup
You can configure Auto-Backup to best meet your needs.
To set Auto-Backup options:
1In the Options > Settings > Editor > Auto-Backup pane, enable or disable
Auto-Backup.
2 Accept the default backup directory or select a different one.
3 (Optional) For Auto-Backup on Save, set the following options:
− Use the backup directory for local and network files, or save the backup with
the original file. Note that the backup directory is always used for remote files.
− Set a time interval (in days) after which backup files are deleted.
4 For Timed Auto-Backup, set a time interval (in minutes) after which HomeSite+
for Dreamweaver MX saves all open modified files.
Using Auto-Backup
You can use Auto-Backup to manage backups or to recover a lost file.
To manage backups created by Auto-Backup:
1 Select Options > Auto-Backup File Maintenance.
2 In the Auto-Backup File Maintenance dialog box, manage backups created
during Save and Extended Search and Replace operations.
3Click Close.
To recover unsaved files after the application closes abnormally:
1 Open HomeSite+ for Dreamweaver MX again.
2 If you have set options for Timed Auto-Backup, the Timed Auto-Backup File
Recovery dialog box automatically appears. Recover each lost file by selecting it
and clicking OK.