
User Guide

Building a tag editor 207
Maintaining tag indentation
The variable EditorTagIndentString contains an indentation string for the
currently selected tag. If the start tag is indented using tabs and characters, the string
is represented as the corresponding combination of tabs and spaces. This variable
can be used to correctly indent tag attributes, as well as tag body contents for tags
which are already indented.
Using OPTIONLinearLayout
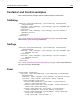
Here is a version of the mytag layout template that responds to user preferences for
single line or indented layout:
<taglayout>
<WIZIF OPTIONLinearLayout EQ ’true’>
<WIZSET Spacer = ’ ’>
<WIZELSE>
<WIZSET Spacer = Chr(13) & Chr(10) & ’ ’>
</WIZIF>
<mytag color="$${clrBGColor}"$${Spacer}face="$${fontFace}
"$${Spacer}size="$${txtSize}">
</taglayout>
The template would generate a tag based on the following user layout preference:
LINEAR:
<mytag color="White" face="Arial" SIZE="10">
NONLINEAR:
<mytag color="White"
face="Arial"
size="10">
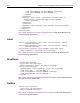
Using TAGDATAUnknownAttributes
The TagDataUnknownAttributes tag contains the list of attributes that are contained
in the original tag string but are not supported by the editor. For example, you can
write an editor for the HTML tag
input. that provides editing capabilities for all basic
attributes, however, the editor will not cover JavaScript event attributes such as,
onCLick). To prevent loss of what are in effect unknown attributes during the editing
process, the editor engine creates the TagDataUnknownAttributes variable
containing a list of unknown attributes together with their original values. You can
use this variable to “stamp” all the unsupported attributes at the end of the tag you
are generating.
<taglayout>
<mytag color="$${colorBGColor}">
<wizif TagDataUnknownAttributes NEQ’’> $$TagDataUnknownAttributes
</wizif>
</taglayout>
If you edit a tag <mytag color="Blue" onClick="CallThis">, the above template
preserves the
onClick attribute even though it is not supported in the editor.