
User Guide

Setting Up Your Document 55
Using guides
Guides are nonprinting lines that help you align and position objects. Guides are blue by default,
but you can change their color if desired (see “Using the grid and guides” on page 54). You can set
guides where you want them using the page rulers or the Edit Guides command. You can add,
modify, and delete guides as needed. You can also lock guides in place. Guides can only exist on
pages; you cannot drag them to the pasteboard.
By default, the Document window does not scroll when you drag a guide. However, you can
set preferences to make this happen. (For more information on setting preferences, see “Using
preferences” on page 25.) You can also change how close objects can be to a guide before
snapping to it, using the Snap Distance preference. For more information, see “Selecting objects”
on page 109.
You can convert paths to guide objects and lock guides using the Layers panel; for more
information, see “Using layers” on page 289.
Note: Guides that reside on a master page can be modified or deleted only from the master page and not from
associated child pages.
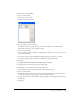
To show or hide guides, do one of the following:
• Select View > Guides > Show.
This command toggles between showing and hiding the guides. A check mark indicates that
the guides are visible.
• Click the check mark column beside the Guides layer in the Layers panel.
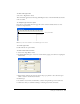
To add a guide by dragging:
1 If the page rulers aren’t visible, select View > Page Rulers > Show to display them.
2 Drag from the top ruler onto the page to set horizontal guides; drag from the left ruler onto the
page to set vertical guides.
Note: When dragging a guide from a ruler, make sure to release the mouse button while the pointer is over the
page. Otherwise, the guide will be deleted.
To delete a guide:
Drag the guide off the page.