
User Guide

Saving and Exporting Files 347
4 Select Page Boundary to display page boundaries in the exported file.
5 Select Selected Objects Only to export only selected objects in the FreeHand document.
Note: The Selected Objects Only option is not available when exporting to a FreeHand file format.
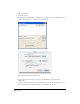
6 Click Setup to select options for the export file format. For information on selecting options
for the format you have selected, see “Exporting vector artwork” on page 350 or “Exporting
bitmap images” on page 352.
7 To launch another application to open the exported file, select Open in External Application.
In the dialog box that appears, navigate to the application that will open the image and
click OK.
For example, you can open an exported Flash SWF file using Flash or a web browser. You can
link each export format to a specific external application; these settings are saved for future
exporting.
8 Click Save (Windows) or Export (Macintosh).
Note: If the document being exported contains Hexachrome colors, an alert message states that Hexachrome
colors will export as CMYK process colors.
To reexport and update the most recent exported document:
Select File > Export Again.
If the document you are updating is not the most recently exported version, the Export dialog box
appears so you can set options before exporting.
To include a thumbnail or preview with files saved or exported in FreeHand format:
1 Display export preferences by doing one of the following:
• In Windows, press Control+U, then click the Export tab.
• On the Macintosh, press Command+U, then click the Export category.
2 Select FreeHand File Preview.
3 Select the file format for file previews: JPEG or BMP.
4 Enter the dimensions for file previews.
5 Set the quality for file previews (JPEG only).
6 Click OK.