
User Guide


Chapter 11330
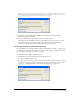
3 Specify which pages to publish, all or a range.
4 To display the HTML Output Warnings dialog box when you convert the document, select
Show Output Warnings.
5 To preview the converted HTML document on your system, select View in Browser or
HTML Editor.
6 Select a browser or editor from the web browser pop-up menu to view the output, or click
Browse and locate an HTML viewing application on your system.
7 Click Save as HTML.
If you selected View in Browser or HTML Editor in step 5, the specified HTML application
launches and displays the converted document.
8 If you selected Show Output Warnings in step 4, the HTML Output Warnings dialog box
appears, indicating any HTML errors in your document.
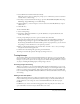
To create or edit an HTML setting:
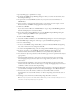
1 Select File > Publish as HTML to view the HTML Output dialog box, if it is not already open.
2 In the HTML Output dialog box, click Setup to open the HTML Setup dialog box.
3 Do one of the following:
• To create a new HTML setting, click the Plus (+) button. In the New HTML Setting dialog
box, enter a name for the new setting and click OK.
• To edit an existing HTML setting, select the setting from the HTML setting pop-up menu.
4 To choose a location to save the HTML document, click Browse and navigate to the
destination folder, then click Select (Windows) or Select [Folder Name] (Macintosh).
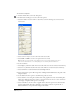
5 To control how objects are positioned on the document page, select an option from the Layout
pop-up menu:
• Select Positioning with Layers to place objects on layers. Layers allow precise positioning
and overlapping of objects; however, layers are not supported by any version 3.0 or earlier
web browsers.
• Select Positioning with Tables to place objects in table cells. Tables are supported by most
browsers; however, table cells do not allow objects to overlap. Overlapping objects are sliced or
combined to achieve accurate table cell positioning.
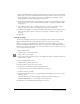
6 For Encoding, select the font encoding format that is appropriate to the language displayed in
your document. For English and most western European languages, select Western (Latin 1).
7 For Vector Art, select a file format to which vector artwork files will be converted.
For information on conversion file formats, see “About compressing artwork for the web” on
page 328.
8 For Images, select a file format to which bitmap image files will be converted.
Note: To set export options for files in GIF, JPEG, or PNG format, you must use the Export dialog box. For more
information, see “Exporting bitmap images” on page 352.