
User Guide


Using Layers, Symbols, and Styles 303
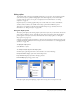
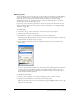
To set how graphic styles are applied and defined:
1 Display object preferences by doing one of the following:
• In Windows, press Control+H, then click the Object tab.
• On the Macintosh, press Command+H, then click the Object category.
2 Under New Graphic Styles, do one of the following:
• Select Auto-Apply to Selection if you want to automatically assign new styles that you create to
objects that are selected in the document at the time.
• Deselect Auto-Apply to Selection if you want objects that are selected at the time you create
new styles to retain their original styles.
3 Click OK.
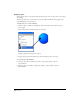
To specify which attributes are affected when styles are applied:
1 Select Edit > Select > None or press Tab to deselect all objects.
2 In the Styles panel, select the style.
3 Click the Styles panel Options menu control and select Style Behavior.
4 Do one of the following:
• For graphic styles, use the Style menu to select the attributes that you want the style to affect:
Both Fill + Stroke, Fill Attributes, or Stroke Attributes.
• For text styles, select attributes and options. Select No Selection from the pop-up menus to
prevent the style from changing those attributes in selected objects. For more information
about these options, see “Creating and editing text styles” on page 274.
5 Click OK.
Adding, duplicating, and removing styles
To add new styles, copy styles, or remove styles, you use the Styles panel.
To create a new style based on the Normal graphic style:
Click the Styles panel Options menu control and select New from Normal.
To create a new style based on a selected object, do one of the following:
• Click the Styles panel Options menu control and select New.
• Drag the object from the workspace to an empty area of the Styles panel.
• Drag the preview swatch beside the object name in the Object panel Properties list to an empty
area of the Styles panel.