
User Guide


Chapter 8272
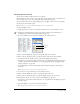
11 To move text automatically to the top of the next column, place an insertion point with the
Text tool and select Text > Special Characters > End of Column.
12 For Flow, click a button to specify how text flows across columns and rows: down all rows in
the first column and then into the second column, or across all columns in the first row and
then into the second row.
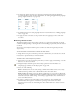
To apply a stroke to table rules or table borders:
1 Using the Pointer tool, select the text block.
2 From the Properties list in the Object panel, select the Text Block property.
3 Select Display Border in the bottom half of the Object panel if you want the table’s outer
border to display. This option is selected by default.
4 Click the Add Stroke button near the top of the Object panel.
5 In the bottom half of the panel, select a stroke style from the pop-up menu, and select options
for the stroke. (For more information, see “Applying attributes to strokes” on page 166.)
6 Select Window > Color Mixer and Window > Swatches to display those panels if they are not
already displayed.
7 Drag a color from the Color Mixer or Swatches panel onto the color box of the Stroke property
you added to the Properties list, or drag a color onto the text block border.
To create a table with uniform cells using columns and rows:
1 Using the Pointer tool, select the text block.
2 Create columns and rows as described earlier in this section, with the following specifications:
• Set Spacing for Columns and Rows to 0.
• For Column Rules, select Full Height, and for Row Rules, select Full Width.
To create a table with variable cells using tabs and paragraph breaks:
1 Drag with the Text tool to create a text block the size of the table.
2 Drag left-align tabs to define the left edge of each column. For more information on setting
tabs, see “Setting tabs, indents, and margins” on page 261.
3 Drag wrapping tabs to define the right edges of columns that contain more than one line
of text.
4 Press Enter (Windows) or Return (Macintosh) to create rows.