
User Guide


Using Type 255
To modify kerning for selected text directly in the workspace:
Drag a text block’s side selection handle. Dragging away from the text block increases kerning,
and dragging toward its center decreases kerning.
To specify kerning or range kerning:
1 Do one of the following:
• To specify kerning, click in a text block with the Text tool to set the insertion point between
two characters.
• To specify range kerning, select the text to which you want to apply kerning.
2 Do one of the following:
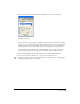
• From the Character options in the Object panel, enter a value in the Kerning or Range
Kerning text box to adjust spacing by a percentage of an em space, and press Enter (Windows)
or Return (Macintosh). (For information on displaying Character options, see “Displaying
type attributes in the Object panel” on page 248.)
• Hold down Control+Alt (Windows) or Command+Option (Macintosh) and press the Right
Arrow or Left Arrow key to increase or decrease kerning by 1 em space. Press
Control+Alt+Shift (Windows) or Command+Option+Shift (Macintosh) while using an arrow
key to increase or decrease kerning by 10% of an em space.
To specify baseline shift, do one of the following:
1 Using the Text tool, select a character or range of characters.
2 Do one of the following:
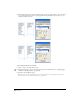
• From the Character options in the Object panel, enter a value in the Baseline Shift text box,
then press Enter (Windows) or Return (Macintosh). (For information on displaying Character
options, see “Displaying type attributes in the Object panel” on page 248.)
• Hold down Control+Alt (Windows) or Control+Option (Macintosh) and press the Up Arrow
or Down Arrow key to raise or lower the baseline.
Note: To create footnotes and superscript special characters such as ™, raise the baseline and reduce the
font size.