
User Guide

Chapter 6170
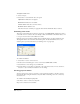
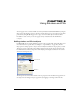
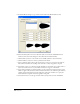
3 In the Edit Brush dialog box, type a name for this brush in the Brush Name text box.
4 Use the Include Symbol controls to add other symbols to the brush. (The Brush Preview
window at the bottom of the dialog box shows what the brush will look like.)
• Click the Plus (+) button to select from a list of available symbols to add to this brush.
• Click the Minus (-) button to remove a symbol from the brush.
• Select a symbol in the list and use the arrow buttons to move it up or down in the stack list.
The stack list determines the stacking order of instances as they are applied to the path.
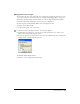
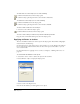
5 Select Paint or Spray to set the mode for this brush. If you select Paint, enter a value from 1 to
500 in the Count text box to set the number of instances to appear on this brush.
6 Select Orient on Path if you want this brush to rotate to follow the orientation of the path to
which it is applied. If you deselect Orient to Path, the brush does not follow the path: when set
to Paint, the brush stretches between the endpoints of the path, and when set to Spray, the
brush maintains its original orientation regardless of the path.
7 Select Fold Corners to use the type of brush strokes used by earlier versions of FreeHand.