
User Guide


Chapter 5156
The Name All Colors Xtra adds all unnamed colors used in a document to the Swatches panel
with default names. The Name All Colors Xtra also lists any colors you have created by applying
the Xtras that manipulate colors, such as Color Control, Desaturate, Darken, Lighten,
Randomize, or Saturate Colors. (For more information, see “Editing colors” on page 161.)
The Name All Colors Xtra does not name colors in bitmap images.
To set automatic renaming preferences for default color names:
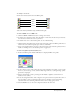
1 Display colors preferences by doing one of the following:
• In Windows, press Control+U, then click the Colors tab.
• On the Macintosh, press Command+U, then click the Colors category.
2 Do one of the following:
• Select Auto-Rename Colors to automatically rename a color when you change it.
• Deselect the option to keep the original name when you change a color.
3 Click OK.
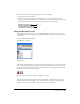
To rename a color in the Swatches panel:
1 Select Edit > Select > None or press Tab to deselect all objects.
2 In the Swatches panel, double-click the color name.
3 Type a unique name for the color.
4 Press Enter (Windows) or Return (Macintosh) or click anywhere in the application to apply
the name.
If you enter the same name as another color in the panel, you’ll be prompted to rename
the color.
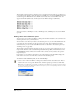
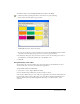
To add unnamed colors to the Swatches panel:
1 Select an object whose color you want to add to the Swatches panel.
2 Choose from the following options:
• Select Window > Object to display the Object panel. Drag from any of the Object panel color
boxes to the arrow button on the Swatches panel.
• In the Object panel, select Add to Swatches from the color pop-up menu. Enter a name for the
color, select Spot or Process, and click Add.
• Select the Eyedropper tool and drag a color swatch from the object to the arrow button on the
Swatches panel.
• Select Xtras > Colors > Name All Colors to add all unnamed colors, including tints, in a
document to the Swatches panel.