
User Guide


Chapter 4126
Finding and replacing graphics
The Find & Replace panel lets you search for and automatically change attributes including color,
stroke width, transformations, path shapes, and blend steps. The feature lets you modify every
occurrence of a specific attribute, including all occurrences of the attribute in hidden objects.
You can replace a selection or object in a page or document. The stroke width, simplify, rotate,
scale, and blend steps attributes can be calculated mathematically.
For more information on searching for printing attributes (halftones and overprinting), see
Chapter 14, “Printing,” on page 375. For more information on replacing colors, see “Making
global color changes” on page 163.
To find and replace graphics:
1 Select Edit > Find and Replace > Graphics or click the Graphics button in the Main toolbar.
2 Under Change In, select Page, Document, or Selection to specify the search.
3 Select a category from the Attribute pop-up menu:
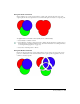
Color lets you select a color to change. Specify the colors using the From and To pop-up
menus, or drag a color from the Color Mixer or Swatches panels onto the color boxes beside
the pop-up menus. Select Include Tints to search for tints of the From color. For more
information on color, see “Using Strokes and Fills” on page 165.
Stroke Width lets you find strokes within the width range you specify using the Min and Max
pop-up menus. For example, to search for widths from 2 to 8 points, you would enter 2 points
in the Min text box and 8 points in the Max text box. To search for a specific width, enter the
width in the Min text box and leave the Max text box empty.
Font lets you search for a specific font and size.
Remove lets you search for and remove invisible objects, overprinting, custom halftones, or
contents.
Path Shape lets you search for all paths of a designated shape, fill, and stroke. To specify the
path to search for, copy the path and click Paste In to the right of the From box. Do the same
in the To box for the path you want to replace the original path.
If you select Path Shape, you can select Transform to Fit Original to keep the original object’s
dimensions for the new object.
Simplify lets you specify the number of points a path must contain; for Allowable Change,
enter a value or drag the slider to set the replacement number of points.
Rotate lets you set the rotation angle to rotate objects around their individual center points.
Scale lets you enter a scale factor to scale objects. To scale objects proportionally, enter the
same percentage in both the X and Y text boxes.
Blend Steps lets you enter the number of steps to search for. In the pop-up menu, select
Resample At to resample at the current printer output resolution.
4 Click Change.