
User Guide

Chapter 396
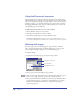
Using the Document inspector
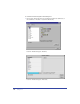
The Document inspector displays a miniature representation of the pasteboard,
with thumbnail icons for each page in your document. You can use the Document
inspector to add and remove pages or set page attributes, such as size, orientation,
and bleed, as well as to set document attributes such as target printer resolution.
By dragging thumbnails of pages in the Document inspector, you can move the
corresponding pages on the pasteboard.
To display the Document inspector, do one of the following:
• Choose Window > Inspectors > Document.
• Click the Document inspector tab if it is visible.
• Click the Document Inspector button in the Main toolbar.
Note: The Document Inspector button does not appear by default when you open
FreeHand. To add the button to your Main toolbar, see “Customizing toolbars” on page 91.
Working with pages
You can set page options—including page size, page orientation, and bleed
value—using the Document inspector. When adding pages, you can set these
options using the Add Pages dialog box, accessed from the inspector.
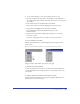
To set page options:
1 Display the Document inspector (see the previous procedure).
2 Choose a page size from the Page Size pop-up menu.
3 Click one of the page orientation buttons to the right of the Page Size pop-up
menu to select a page orientation: portrait (tall) or landscape (wide).
4 Enter a desired bleed value in the Bleed text box. The paper dimensions must
be larger than the page size you specify. To set the dimensions, choose File >
Print. For more information on bleeds, see “Setting PostScript prepress
options” on page 394.
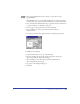
Page orientation
Page size pop-up menu
Page thumbnail views