
User Guide


Chapter 12400
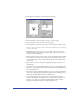
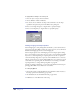
To apply halftone settings to selected objects:
1 Select an object or objects in the document.
2 Choose Window > Panels > Halftones.
3 For Screen, choose a halftone dot shape. Choose Default to use the shape
specified in the Separations panel in the Printer Setup dialog box.
4 Enter a screen angle in degrees or drag the dial to specify the Angle.
5 Enter a screen frequency or drag the slider to specify Frequency.
Setting imaging and output options
Use the Imaging tab to add printing labels and marks to your document and set
options that control how film is printed. To set these options, you use the Labels
& Marks and Imaging Options areas of the Imaging tab.
Use the Output Options area of the Imaging tab or the Output Options dialog
box to control Output options. You can set options to control printing of hidden
layers and to control the printing of complex paths. You can also set options to
control how bitmap image data is exported, and how RGB colors are converted.
Output options also let you control whether RGB colors are converted to process
colors when color-separating a file. For information on converting colors when
exporting the file, see “Saving and Exporting Files” on page 421.
To improve printing performance, you can control the number of blend steps in
printing gradient fills, and set a flatness for curved lines.
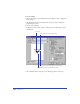
To set Imaging Options:
1 Choose File > Print or click the Print button in the Main toolbar and select a
PostScript printer from the Printer pop-up menu.
2 On the Macintosh, select FreeHand from the pop-up menu.
3 In Windows or on the Macintosh, click Setup.