
User Guide


Printing 397
4
In the Print Setup dialog box, click the Separations panel.
5 Choose whether to print each ink on one page or separate pages:
• Select Composite to print all of the inks on one page.
• Select Separations to print each spot and process color ink on a separate page.
Note: You can also choose the options in step 5 in the Print dialog box (see “Setting up
to print” on page 388).
6 Select Print Spot Colors as Process to convert all spot colors to their closest
CMYK equivalent at print time. This option affects only printed output, not
the colors in the document file.
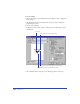
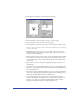
7 In the Separations Colors window, click to create a check mark in the P column
for an ink color to print the color as a separation (the default setting). Click
in the column again to create a dash to prevent the ink color from printing as
a separation.
8 Click in the O column to view the Overprint Ink dialog box and do one of
the following:
• Select On to turn on overprinting (to print the color over an underlying color
when colors overlap in the artwork). A check mark in the O column indicates
that overprinting is on.
• Select Off to turn off overprinting and knock out colors (delete the underlying
color in the overlapping area and print the specified color on blank paper). A
dash in the O column indicates that overprinting is off.
• Select Threshold and enter a percent value to control the shade of ink to
overprint. For example, a Threshold of 90% overprints the specified ink color
when it is at a tint of 90% or higher. A black diamond in the O column
indicates that a Threshold level for overprinting has been set.