
User Guide


Chapter 12394
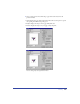
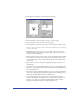
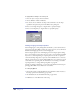
To reposition objects in the print preview for printing:
1 Position the pointer in the print preview area; the cursor becomes a
grabber hand.
2 Use the grabber to reposition objects on the paper for printing.
Note: Repositioning objects in the print preview area repositions the objects for the
current output only. The objects in the document file are not affected.
To restore the original location of objects:
1 Move the pointer to the gray area of the print preview pasteboard to display
the Reset arrow.
2 Click with the Reset arrow to restore the original location.
Setting PostScript prepress options
You can set prepress options to control color separations, halftone screens, crop
and registration marks, paper size and orientation, and other options. You must
select a PPD to use prepress options (see “Choosing a PPD” on page 390).
To set prepress options, you can choose a predefined setting from the Print Setting
pop-up menu in the Print dialog box. You can also select custom settings in the
Print Setup dialog box.
Prepress settings are determined by the types of output devices used in printing
your documents. You should consult with your prepress service bureau or print
shop to determine the correct prepress settings for your project.
Working with the Print Setup dialog box
Use the Print Setup dialog box to select options for customizing prepress settings.
You can save custom settings to use with other documents. You can also modify
and resave the predefined settings that ship with FreeHand.
A plus (+) sign precedes the file name in the Print Setting pop-up menu if you’ve
made changes in the Print Setup dialog box.
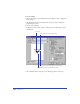
To create or save print settings:
1 Choose File > Print or click the Print button in the main Toolbar. On the
Macintosh, choose FreeHand from the pop-up menu in the Print dialog box.
2 In the Print dialog box, click Setup.