
User Guide

Creating Web Graphics and Animation 379
To animate objects:
1 Select the objects that you want to animate. A nested object included in a
group behaves as a single object.
2 Choose Window > Panels > Layers to display the Layers panel.
The Layers panel will display new layers as you create them in the following steps.
3 Choose Xtras > Animate > Release to Layers.
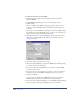
4 For Animate, choose animation effects to determine how objects are
released to layers:
• Select Sequence to release objects in sequence to separate layers.
• Select Build to create a stacking effect by copying objects in sequence to
subsequent layers. For example, if you have a group of two objects, the first
object is placed on Layer 1, and a copy of the first and second objects are
placed on Layer 2.
• Select Drop to copy objects to all layers but omit one object in sequence from
each layer. For example, if you select a group of three objects, the second and
third objects are placed on Layer 1, the first object and a copy of the third
object are placed on Layer 2, and copies of the second and third objects are
placed on Layer 3.
• Select Trail to copy and release objects to the number of layers you specify.
Objects are copied incrementally to the specified number of layers. Enter a
number for Trail By to specify the number of layers on which objects will be
copied. For example, enter 4 for Trail By to copy each object in the 4 layers
following the layer that contains the object.
5 Select Reverse Direction to release the objects in reverse stacking order and
animate the sequence in the opposite direction.
6 Select Use Existing Layers to release objects to existing layers, beginning with
the current layer. Deselect the option to release objects to new layers created
by the Xtra.
7 If you chose Use Existing Layers, select Send to Back to release the objects to
the back of the stacking order.
8 Click OK.