
User Guide


Using Type 355
• Choose Full Width to create rules the width of the full row.
Note: To apply a stroke to the rules, see the procedure that follows.
11 To move text automatically to the top of the next column, place an insertion
point with the Text tool and choose Text > Special Characters > End of Column.
12 For Flow, click a button to specify how text flows across columns and rows:
down all rows in the first column and then into the second column, or across
all columns in the first row and then into the second row.
To apply a stroke to table rules or borders:
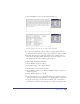
1 Choose Window > Inspectors > Object.
2 In the Object inspector, select Display Borders.
3 Use the Pointer tool to select the text block.
4 Choose Window > Panels > Color Mixer and Window > Panels > Swatches to
display those panels.
5 Choose Window > Inspectors > Stroke.
6 In the Stroke inspector, choose a stroke style from the pop-up menu, and choose
options for the stroke. For more information, see “Applying strokes” on page 275.
7 To apply a stroke, drag a color from the Color Mixer panel or the Swatches
panel onto the color box in the Stroke inspector, or onto the text block border.