
User Guide


Color, Strokes, and Fills 289
You can edit Custom fills by changing their spacing, angle, width and other
attributes. You can also change the color of the Bricks, Circles, Hatch, and Squares
fills. Custom fills print at one size on PostScript output devices and do not scale
with the object they fill.
To apply a custom fill to a selected object:
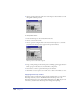
1 Choose Window > Inspectors > Fill to display the Fill inspector.
2 In the Fill inspector, choose Custom from the list at the top of the inspector.
3 Choose one of the following patterns from the pop-up menu and then specify
its options:
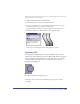
• Black & White Noise applies an opaque, black-and-white fill. It has no options.
• Brick simulates a brick fill. Specify a Mortar color using the color box; brick
width and height values in the document’s unit of measure; and an angle to
rotate the fill clockwise (positive value) or counterclockwise (negative value).
• Circles applies a fill of circles. Specify a radius to change the size of circles, and
to set the spacing between circles as measured from radius point to radius
point. To avoid overlapping circles, set the spacing to more than twice the
radius. Enter an angle to rotate the fill clockwise (positive value) or
counterclockwise (negative value).
• Hatch draws lines to simulate pen hatching. Specify a color. Enter Angle 1 and
Angle 2 values to rotate the first and second set of parallel lines clockwise
(positive value) or counterclockwise (negative value). Specify spacing between
hatch lines and their width.
• Noise applies a Whiteness value as a percentage from 0% (black) to 100%
(white). Larger Whiteness values result in a noisier fill.
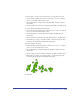
• Random Grass and Random Leaves apply a grass or leaf pattern fill. Specify
from 1 to 32,000 blades of grass or leaves.