
User Guide


Chapter 8288
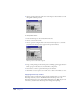
Use the Fill inspector to apply fills to selected objects or to set the default fill
attributes for new objects in the active document.
For more information on applying colors to fills, see “Applying color in
FreeHand” on page 274.
Note: Your onscreen display and printed results depend on the complexity of the fill and
your output device. For more information, see “Compatible output devices” on page 454.
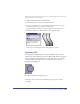
Applying basic fills
To apply a fill to a selected object:
1 Choose Window > Inspectors > Fill to display the Fill inspector.
2 In the Fill inspector, choose Basic from the list at the top of the inspector.
3 Do one of the following to choose a color for the fill:
• Click the color box and choose a color from the pop-up color palette.
• Use the Eyedropper tool to drag a color swatch to the color box.
• Choose a color from the list to the right of the color box.
Note: For information on the Overprint option, see “Guidelines for overprinting” on page
407,
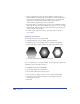
Applying custom fills
You can choose Custom fill to apply a preset, repeating PostScript pattern to an
object. All Custom fills except Black & White Noise can be edited.
Opaque custom fills are Black & White Noise, Noise, Bricks, and Tiger Teeth.
Objects behind the fill aren’t visible when printed. Transparent custom fills are
Circles, Hatch, Random Grass, Random Leaves, Squares, and Top Noise.
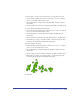
Custom fills
Random grass
Circles
Hatch
Noise
Bricks
Random leaves
Top noise
Tiger teeth
Squares
Black & white noise