
User Guide


Chapter 6208
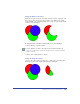
Blends between spot colors result in intermediate steps using only tints of those
spot colors and will print on two separation plates. When printing a
spot-to-process blend, the spot color is set to overprint the process color. Steps
in spot-to-spot and spot-to-process blends are set to process colors if the blend
is ungrouped. This also occurs if incompatible colors or fills are chosen, or if the
blends are exported to earlier versions of FreeHand or to applications such as
Illustrator, which may not support spot colors in blends. For more information
on colors, see “Applying color in FreeHand” on page 274.
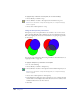
Blends work with basic and gradient fills only. Blends do not work on
bitmap images.
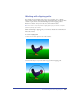
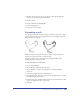
To create a blend from two or more objects:
1 Check that the objects you want to blend are in the correct stacking order.
2 Select the objects.
3 Do one of the following:
• Choose Window > Toolbars > Xtra Operations and click the Blend button on
the Xtra Operations toolbar.
• Choose Modify > Combine > Blend.
• Choose Xtras > Create > Blend.
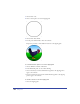
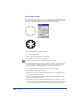
To blend objects from point to point:
1 Select objects and subselect points within each object.
2 Choose Modify > Combine > Blend.
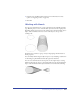
Modifying blends
You can adjust the number of steps and other options in a blend group using the
Object inspector.
To modify a blend:
1 Select the blend.
2 Choose Window > Inspectors > Object to display the Object inspector.
3 In the Object inspector, enter a value in the Steps text box to change the number
of intermediate objects; the more steps there are, the smoother the blend.
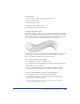
4 Enter a percentage value in the Range % text box to adjust where the
intermediate objects begin and end. The First text box controls how closely the
steps are placed to the bottom path, and the Last text box controls how closely
the steps are placed to the top path.