
User Guide

Chapter 3110
Using guides
Guides are nonprinting blue lines that help you align and position objects. You
can change the color of guides; see “Using the grid and guides” on page 109. You
can set guides where you want them using the page rulers or the Edit Guides
command. You can add, modify, and delete guides as needed. You can also lock
guides in place.
By default, the Document window does not scroll when you drag a guide.
However, you can set preferences to make this happen. (For more information on
setting preferences, see “Using preferences” on page 77.) You can also change how
close objects can be to a guide before snapping to it, using the Snap Distance
preference; for more information, see “Selecting objects” on page 177.
You can convert paths to guide objects and lock guides using the Layers panel; for
more information, see “Using layers” on page 237.
To show or hide guides:
Choose View > Guides > Show.
This command toggles between showing and hiding the guides. A check mark
indicates that the guides are visible.
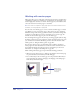
To add a guide by dragging:
1 If the page rulers aren’t visible, choose View > Page Rulers > Show to
display them.
2 Drag from the top ruler onto the page to set horizontal guides; drag from the
left ruler onto the page to set vertical guides.
Note: The pointer has to be over the page when the mouse button is released for the
guide to remain on the page after being pulled from the ruler.
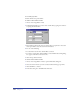
To add guides precisely:
1 Do one of the following:
• Choose View > Guides > Edit.
• Double-click an existing guide.
2 Click Add.
3 Select Horizontal or Vertical.
4 Choose an Add By option to add guides:
• Select Count and enter a value to add a precise number of guides.
• Select Increment and enter a value to add guides at set intervals.
5 Enter the first and last position of the guides.
6 Set the page range.