
User Guide


Setting up Your Document 109
Using the grid and guides
For alignment aids, you can display nonprinting lines as a grid or guides. You can
change the color of these lines.
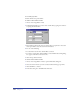
To change the color of the grid or guides:
1 Choose Edit > Preferences. Click Colors.
2 To change the color of the guides or grid, click the respective Guide Color or
Grid Color box and select a new color.
3 Click OK.
For more information on selecting colors, see “Applying color in FreeHand” on
page 274.
Using the grid
The grid is a nonprinting background of horizontal and vertical dotted lines. You
can use the grid to align objects precisely, and you can force objects to snap to grid
intersections or positions relative to their original position within a grid cell.
To show or hide the grid:
Choose View > Grid > Show.
This command toggles between showing and hiding the grid. A check mark
indicates that the grid is visible.
To turn snapping to the grid on or off:
Choose View > Grid > Snap to Grid.
This command toggles between turning snapping to the grid on and off. A check
mark indicates that snapping to the grid is on.
To set grid options:
1 Choose View > Grid > Edit.
2 Enter a grid size in the units of measure specified for the current document.
(For more information on setting units of measurement, see “Defining custom
page sizes” on page 101.)
3 Choose the snapping behavior:
• To force objects to snap to the same relative position within the destination
grid cell, select Relative Grid.
• To force objects to snap to precise grid intersections, deselect Relative Grid.
4 Click OK.