
User Guide
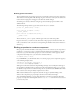

Table Of Contents
- Contents
- Working with Flash MX 2004
- Creating Basic Components in Flash MX 2004
- Creating Advanced Components in Flash MX 2004
- Contents
- About Creating components
- Writing the component’s ActionScript code
- Simple example of a class file
- General process for writing a class file
- Selecting a parent class
- Identifying the class, symbol, and owner names
- About the component instantiation life cycle
- Writing the constructor
- Specifying clip parameters
- Implementing the constructObject2() method
- Implementing the init() method
- Implementing the createChildren() method
- Implementing the commitProperties() method
- Implementing the measure() method
- Implementing the layoutChildren() method
- Implementing the draw() method
- Defining getters and setters
- Component metadata
- Defining component parameters
- Handling events
- Using the Event metadata
- About invalidation
- Skinning custom controls
- Adding styles
- Making components accessible
- Improving component usability
- Best practices when designing a component
- Using the ModalText example
- Troubleshooting
- Index

40 Chapter 2: Creating Basic Components in Flash MX 2004
In the component’s class file, you must also override the name of the skin. Macromedia
recommends that you apply the skin to your component as a clip parameter in the
constructObject2() method rather than rely on the timing of the instantiation process. This is
especially true when the component creates child components that rely on the positioning of
the skin.
You can override some or all of the control’s skins. For example, the Button control has the
following basic skins, each representing a state of the control:
• falseUpSkin
• falseDownSkin
• falseOverSkin
• falseDisabledSkin
• trueUpSkin
• trueDownSkin
• trueOverSkin
• trueDisabledSkin
Each state is represented as a variable in the class file, or is an inherited variable. By setting the
value of one of these variables, you instruct Flex to apply a new skin, using the symbol name to
find the skin.
When you add a new skin, it should respond to resizing and drawing methods of the component.
For a list of what skins are used by what controls, see each control’s entry in Developing Flex
Applications.
This section describes a simple method for changing the skin for one of the states of the standard
Button control. You can use the steps in this procedure to change the skin for any visual control
in Flex.
To create a custom component with a different skin:
1.
In the Flash environment, create a FLA file and set the classpath settings to include the Flex
classes and the local directory. For more information, see “Changing the Flash classpath”
on page 10.
2.
Insert a new symbol by selecting Insert > New Symbol. The Create New Symbol dialog box
appears. This new symbol will be the new component.
3.
In the Create New Symbol dialog box, do the following:
a
Select the MovieClip for Behavior option (the default).
b
Select the Export for ActionScript check box.
c
Enter the appropriate name, identifier, and class file in the Name, Identifier, and AS 2.0
Class fields.
d
Clear the Export in First Frame check box.
4.
In Edit Symbols mode for the new symbol, rename the Timeline’s first layer to main, and add
a
stop() action in the Actions Frame.