
User Guide

32 Chapter 2: Using MXML
]]>
</mx:Script>
<mx:Panel title="My Application" marginTop="10" marginBottom="10"
marginLeft="10" marginRight="10" >
<!-- Trigger the formatter while populating a string with data. -->
<mx:TextInput text="{ZipCodeDisplay.format(storedZipCode)}" />
</mx:Panel>
</mx:Application>
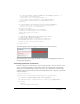
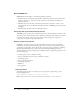
The following figure shows the application rendered in a web browser window:
For more information about formatter components, see Chapter 34, “Formatting Data,” in
Developing Flex Applications.
Using Cascading Style Sheets (CSS)
You can use style sheets based on the Cascading Style Sheets (CSS) standard to declare styles to
Flex components. The
<mx:Style> tag contains inline style definitions or a reference to an
external file that contains style definitions.
The
<mx:Style> tag must be an immediate child of the root tag of the MXML file. You can
apply styles to an individual component using a class selector, or to all components of a certain
type using a type selector.
The following example defines a class selector and a type selector in the
<mx:Style> tag. Both the
class selector and the type selector are applied to the Button control:
<?xml version="1.0"?>
<mx:Application xmlns:mx="http://www.macromedia.com/2003/mxml">
<mx:Style>
.myclass { color: Red } /* class selector */
Button { font-size: 18pt} /* type selector */
</mx:Style>
<mx:Panel title="My Application" marginTop="10" marginBottom="10"
marginLeft="10" marginRight="10" >
<mx:Button styleName="myclass" label="This is red 18 point text."/>
</mx:Panel>
</mx:Application>