
User Guide


Tutorial: Building custom components with Flex Builder 39
4.
Insert a Tile container to lay out the products by clicking anywhere in the VBox container, and
clicking the Tile button in the Containers category of the Insert bar.
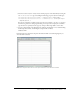
Flex Builder inserts a Tile container in the component file.
5.
With the insertion point still blinking in the Tile container, specify the values for the following
properties in the Attributes panel:
■ Common > id: tileView
■ Size > y: 12
6.
Save the component file in the fbComponents folder by selecting File > Save, and naming the
component file as follows:
ThumbnailView.mxml
7.
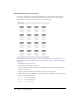
Insert placeholder images for the products by clicking anywhere inside the Tile container,
clicking the Image button in the Controls category of the Insert bar, and selecting the following
image in the mockups folder:
fbComponents/mockups/tnProduct.png
You want to insert five or more placeholder images to represent the products. In the tutorial on
data bindings (see “Tutorial: Binding components to data with Flex Builder” on page 58), you
replace these placeholder images with a Repeater component and a custom component that
retrieves product data and displays each product’s thumbnail image, name, and price.
8.
Click inside the right edge of the Tile container (without selecting the thumbnail image), and
repeat step 7 four more times to insert more thumbnail images in the Tile container.
If you’re unable to click inside the edge, click the Expanded button on the Document toolbar
to add extra space around the container.
9.
Save your work.