
User Guide


26 Chapter 2: Flex Builder Tutorials
5.
In the URL Prefix text box, enter the following URL:
http://localhost:8700/samples/
Caution: Flex Builder may auto-populate this text box with http://localhost:8700/flex/. Make sure
you change the value to http://localhost:8700/samples/.
To get the Flex server to compile files while you work, Flex Builder uploads the file to the
application root folder you specified and attempts to request it using the URL prefix.
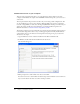
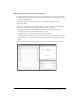
The Flex Server Site Setup dialog box should look like this:
6.
Click OK to define the site and close the dialog box, and then click Done to close the Manage
Sites dialog box.
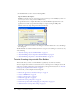
The Flex Builder site is defined and the tutorials are set up. To start working on a tutorial, see any
of the following:
• “Tutorial: Creating a layout with Flex Builder” on page 26
• “Tutorial: Building custom components with Flex Builder” on page 34
• “Tutorial: Binding components to data with Flex Builder” on page 58
Tutorial: Creating a layout with Flex Builder
This tutorial shows you how to use Flex Builder to quickly lay out a Flex user interface.
You can complete this tutorial as a stand-alone unit or as the first part of a multipart tutorial. In
either case, you must complete the setup tutorial before you begin. For instructions, see “Tutorial:
Setting up a development environment” on page 21.
In this tutorial, you’ll accomplish the following tasks:
• “Review the approved user interface mock-ups” on page 27
• “Create an MXML file” on page 28
• “Import your CSS styles” on page 29
• “Position the page title” on page 30
• “Position the catalog component” on page 31
• “Position the product detail and shopping cart components” on page 32
• “Add view buttons to the product catalog” on page 33