Using Flex Builder
Trademarks ActiveEdit, ActiveTest, Add Life to the Web, Afterburner, Aftershock, Andromedia, Allaire, Animation PowerPack, Aria, Attain, Authorware, Authorware Star, Backstage, Blue Sky Software, Blue Sky, Breeze, Bright Tiger, Captivate, Clustercats, ColdFusion, Contents Tab Composer, Contribute, Design In Motion, Director, Dream Templates, Dreamweaver, Drumbeat 2000, EDJE, EJIPT, Extreme 3D, Fireworks, Flash, FlashCast, FlashHelp, Flash Lite, FlashPaper, Flex, Flex Builder, Fontographer, FreeHand, Generat
CONTENTS CHAPTER 1: Getting Started with Flex Builder . . .......................... 5 Exploring the authoring environment . . . . . . . . . . . . . . . . . . . . . . . . . . . . . . . . . . . 5 Starting a new application in Flex Builder . . . . . . . . . . . . . . . . . . . . . . . . . . . . . . . . 9 Defining a site for the Flex Sample Apps application . . . . . . . . . . . . . . . . . . . . . . . 12 Getting help in Flex Builder . . . . . . . . . . . . . . . . . . . . . . . . . . . . . . . . . . . . .
CHAPTER 5: Working with Components . . . . . . . . . . . . . . . . . . . . . . . . . . . . . . 117 Inserting controls and containers in an MXML file . . . . . . . . . . . . . . . . . . . . . . . 117 Creating MXML component files . . . . . . . . . . . . . . . . . . . . . . . . . . . . . . . . . . . . 121 Synchronizing with custom components on the server . . . . . . . . . . . . . . . . . . . . 125 CHAPTER 6: Working with Data . . . . . . . . . . . . . . . . . . . . . . . . . . . . . . . . . . . . .
CHAPTER 1 Getting Started with Flex Builder This chapter provides an overview of Macromedia Flex Builder and steps to get started developing Flex applications. Flex Builder is an integrated development environment (IDE) for Flex developers. Because it’s tightly integrated with the Macromedia Flex server, the Flex application model, and the Flex programming languages, Flex Builder can improve the productivity of all members of your development team. This guide focuses on Flex Builder.
Design view (View > Design) lets you lay out and edit an MXML user interface visually. Design view has two modes: Expanded and Standard. In Expanded mode, you can easily insert, edit, position, or resize MXML components because Flex Builder adds temporary borders and padding around objects. In Standard mode, Flex Builder removes the borders and padding to give you a more accurate picture of how the MXML file will look in Macromedia Flash Player. Code view (View > Code) lets you work with code.
The Tag inspector lets you set the properties of containers and components in the file. You can also use it to apply effects, specify event handlers, modify CSS styles, and create data bindings. The Tag inspector replaces the traditional Property inspector in Dreamweaver. While you can still use the Property inspector for editing HTML and other document types in Flex Builder, it is disabled when you work on MXML or ActionScript files.
The Data panel lets you inspect the data services (such as web services) and data models in the current MXML file, as well as insert or delete services in the file. You can work in Design view, Code view, or both. To switch between Design and Code views: 1. Open any MXML file in Flex Builder by double-clicking the file in the Files panel (Window > Files). 2. If you’re in Code view and you want to work in Design view, do one of the following: ■ Click the Design button on the Document toolbar.
Starting a new application in Flex Builder The first step in creating any new Flex application in Flex Builder is to define a Flex Builder site. A Flex Builder site is analogous to a project in other development environments: it lets you manage files and transfer them to the computer running the Flex server. A Flex Builder site also lets you visually design, preview, and debug MXML and ActionScript files without leaving Flex Builder. You need access to a Flex server before you can define a site.
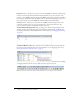
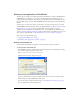
To define a Flex Builder site with advanced options: 1. In Flex Builder, select Site > Manage Sites, click the New button on the Manage Sites dialog box, and select Site from the context menu. The Site Definition dialog box appears. If the Basic tab is selected, click the Advanced tab and select Local Info from the Category list (it should be the default). For possible settings for this dialog box, see “Examples of site settings” on page 15. 2.
6. In the URL Prefix text box, specify the URL prefix that Flex Builder should append to Flex file names. To get a file compiled at design time, Flex Builder sends the file to the Flex application root folder and then attempts to request it using a URL—in effect Flex Builder becomes a client. Flex Builder deduces the correct URL by combining the URL prefix you specify with the file name. For example, if your application’s URL is www.macromedia.com/flex/start.
For example, if you installed the Flex server on a Windows computer using the integrated JRun4/Flex install option, the application root folder of the default application is as follows: C:\Program Files\Macromedia\Flex\jrun4\servers\default\flex In this example, the JRun root (jrun_root) is C:\Program Files\Macromedia\Flex\jrun4\, the JRun4 server (server) is called default, and the Flex application (Flex_app) is called flex. The flex folder has a WEB-INF\flex subfolder with a flex-config.xml file: ...
3. In the Local Root Folder text box, click the folder icon and select the following folder: C:\Program Files\Macromedia\Flex\jrun4\servers\default\samples\ This step tells Flex Builder where the application files are located on your hard drive. 4. In the Flex Server Root Folder text box, make sure the following path is specified: C:\Program Files\Macromedia\Flex\jrun4\servers\default\samples\ This folder must always be a Flex application root folder on the server.
Defining the site if the Flex server is remote This section describes how to define a Flex Builder site to work with the Flex Sample Apps application if the Flex server is installed and running on a different computer than Flex Builder. For more information, see Installing Flex on the Macromedia website at www.macromedia.com/ go/flex_install/. Before you start, you can review example settings for common J2EE servers. See “Examples of site settings” on page 15.
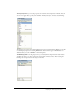
5. Click Testing Server in the Category list to display the Testing Server settings. You use the Testing Server options to tell Flex Builder where it can “test” files—that is, where it can send files to be compiled at design time. Flex Builder needs to get these files compiled so you can preview MXML files, get build and debugging information, and connect to back-end systems. 6. Select MXML for JSP from the Server Model pop-up menu. This tells Flex Builder what kind of web application you’re developing.
Caution: These site settings assume default installations of both the application server and the Flex server. The settings may not work for custom installations.
Getting help in Flex Builder Flex Builder has a variety of resources to help you develop Flex applications. You can get contextsensitive help about an MXML tag, find out how to use a Flex Builder feature, or look up a term in the Flex ActionScript Language Reference.
Macromedia website resources The Macromedia website contains the following resources to support Flex developers: Flex Builder support pages on the Macromedia website at www.macromedia.com/go/ fb_support/ helps you get the most out of Flex Builder. The website is updated regularly with the latest information on Flex Builder, plus advice from expert users, examples, tips, updates, and information on advanced topics. The Flex Support Center on the Macromedia website at www.macromedia.
This section covers the following topics: • • • • “System requirements for Flex Builder” on page 19 “About web servers and Flex” on page 19 “About J2EE application servers and Flex” on page 19 “About the Flex server” on page 20 System requirements for Flex Builder The following hardware and software is required to run Flex Builder.
• Jakarta Tomcat 4.1.29 or 5.0.18. You can download a copy of Tomcat from the Jakarta Project website at http://jakarta.apache.org/tomcat/. • IBM WebSphere Application Server 5. You can download a trial version from the IBM website at www7b.software.ibm.com/wsdd/downloads/WASsupport.html#download. • BEA WebLogic Server 7 or 8.1. You can download a trial version from the BEA website at http://commerce.bea.com/index.jsp.
CHAPTER 2 Flex Builder Tutorials This series of four interconnected tutorials explains how you can build a simple Macromedia Flex application using Macromedia Flex Builder. The application is part of a website for the fictitious Flex Store company. The application gives visitors the ability to view a product catalog, find out more about each product, and add products to a shopping cart. The application is a simplified version of the Flex Store application installed with the Flex server.
Install the Flex server on your computer This part of the tutorial describes how to set up the Developer edition of Flex on the same computer as Flex Builder. To compile and run MXML and ActionScript files, you need access to a Flex server. The setup described in this part of the tutorial is only one of many possible configurations. You can also install Flex on a remote server running a different J2EE server and access it through a network or using FTP.
5. On the Install Options dialog box, select the second option, Macromedia Flex with integrated JRun4. The dialog box gives you another installation option. This tutorial assumes that you selected the Integrated JRun4/Macromedia Flex option. 6. After you finish installing Flex 1.5, install any Flex updaters available on the Macromedia website at www.macromedia.com/go/flex_updaters. 7. Start the server by selecting Start > All Programs > Macromedia > Macromedia Flex > Start Integrated Flex Server.
For more information, see the Flex installation documentation on the Macromedia website at www.macromedia.com/go/flex15_install/. You can verify that the Flex server is running normally as follows: 1. Open the following URL in your browser: http://localhost:8700/samples The Flex Sample Apps page appears. 2. Select a sample application to run it.
Define a Flex Builder site In this part of the tutorial, you define a Flex Builder site for the tutorials. A Flex Builder site lets you visually design, preview, and debug MXML and ActionScript files without leaving Flex Builder. After you define the Flex Builder site, you can start working on the tutorials. This section assumes you installed the Flex server on the same computer as Flex Builder using the integrated JRun/Flex install option.
5. In the URL Prefix text box, enter the following URL: http://localhost:8700/samples/ Caution: Flex Builder may auto-populate this text box with http://localhost:8700/flex/. Make sure you change the value to http://localhost:8700/samples/. To get the Flex server to compile files while you work, Flex Builder uploads the file to the application root folder you specified and attempts to request it using the URL prefix. The Flex Server Site Setup dialog box should look like this: 6.
Review the approved user interface mock-ups During the planning and approval stages of the project, members of your team produced final mock-ups of the user interface for the Flex Store. You will use these mock-ups to guide you when you create the MXML layout. The final mock-ups for the Flex Store application are stored in your fbLayout folder: /fbLayout/mockups You can open a mock-up file in your favorite image editor from the Files panel in Flex Builder.
The user will also have the option of viewing thumbnails in the product catalog on the left side of the layout. The second mock-up file, uiThumbs.
4. Set the following property in the Attributes panel of the Tag inspector (Window > Tag Inspector): ■ Styles > verticalGap: 0 Note: The angle bracket means the verticalGap property is located in the Styles category of the Attributes tab. This convention is used throughout the tutorials. 5. Save the file in the fbLayout folder by selecting File > Save, double-clicking the fbLayout folder, and naming the file as follows: flexstore.
Position the page title After importing the CSS styles, the next task is to create a basic layout for the user interface. In this part of the tutorial, you position the page title (Flex Store) in the upper left corner of the layout, as indicated in the mock-up of the user interface (see “Review the approved user interface mock-ups” on page 27). You decide to use a VBox (for vertical box) container to position the page title at the top of the file.
Position the catalog component In this part of the tutorial, you position the product catalog on the left side of the user interface as shown in the mock-ups (see “Review the approved user interface mock-ups” on page 27). To meet this design requirement, you decide to use an HBox (for horizontal box) container to position the two halves of your user interface side by side. 1.
8. With the ViewStack container still selected, set the following property in the Attributes panel: ■ Effects > changeEffect: ■ Size > height: ■ Size > width: Fade 100% 100% You can select the Fade value from the pop-up menu. The Fade effect will make the ViewStack container change from transparent to opaque in 500 milliseconds (the default effect duration). 9. Save your work.
6. Insert another Canvas container by switching to Code view, clicking immediately after the closing tag, and clicking the Canvas button on the Insert bar. After you accept the default width and height values in the dialog box that appears, Flex Builder inserts another Canvas container in the VBox. You want to insert the shopping cart component in this container. 7.
5. With the insertion point still blinking in the HBox container, set the value for the following property in the Attributes panel: ■ Styles > horizontalGap: 0 6. Insert the thumbnail view button by clicking inside the HBox container, clicking the Image button in the Controls category of the Insert bar, and selecting the following image file: /fbLayout/assets/images/thumb_off.png 7.
Build the grid view component According to the following mock-up, the grid view component should display the Flex Store product catalog as a two-column grid of names and prices. The user can select the grid view by clicking a button at the lower edge of the catalog. The grid view component does not contain any product data in this tutorial. Another tutorial describes how to add data (see “Tutorial: Binding components to data with Flex Builder” on page 58). 1.
4. With the insertion point still blinking in the VBox container, specify the values for the following properties in the Attributes panel: 100% ■ Size > height: ■ Size > width: ■ Styles > verticalGap: 100% 0 Note: The “Size > height” expression means the height property is located in the Size category of the Attributes tab. This convention is used throughout the tutorials. 5.
9. Switch to Code view (View > Code) and set column properties of the DataGrid by locating the two tags, and adding the following properties (shown in bold type): You can use Code hints to quickly set these properties.
Build the thumbnail view component According to the following mock-up, the thumbnail view component should display the Flex Store product catalog as a set of thumbnails with names and prices. The user can select the thumbnail view by clicking a button at the lower edge of the catalog. The thumbnail view component will not contain any product data in this tutorial. Another tutorial describes how to add data (see “Tutorial: Binding components to data with Flex Builder” on page 58). 1.
4. Insert a Tile container to lay out the products by clicking anywhere in the VBox container, and clicking the Tile button in the Containers category of the Insert bar. Flex Builder inserts a Tile container in the component file. 5. With the insertion point still blinking in the Tile container, specify the values for the following properties in the Attributes panel: ■ Common > id: ■ Size > y: tileView 12 6.
In Design view, the completed component should look similar to the following figure if you select the VBox container: Note: The component will scale to fit in the space allotted to it in the flexstore.mxml file. Build the product detail component According to the component’s functional specification, the product detail component should display product details when a user clicks one of the products in the product catalog.
The following is a mock-up of the component: The product detail component will not contain any data in this tutorial. Another tutorial describes how to add data (see “Tutorial: Binding components to data with Flex Builder” on page 58).
3. With the insertion point still blinking in the Panel container, specify the values for the following properties in the Attributes panel: Product Details ■ Common > title: ■ Styles > marginBottom: ■ Styles > marginLeft: ■ Styles > marginRight: ■ Styles > marginTop: 8 8 8 8 4. Insert an HBox container inside the Panel container by clicking anywhere inside the Panel container and clicking the HBox button in the Containers category of the Insert bar.
12. Save the component file in the fbComponents folder by pressing Control+S, double-clicking the fbComponents folder, and naming the component file as follows: ProductDetail.mxml In Design view, the component’s layout should look similar to the following figure if you select the Panel container: Note: The component will scale to fit in the space allotted to it in the flexstore.mxml file.
3. With the Image still selected in the file, change the following properties in the Attributes panel: ■ Size > height: ■ Size > width: ■ Size > x: 0 ■ Size > y: 0 140 150 4.
In Design view, the component should look similar to the following figure if you select the Panel container: Finish the footer of the product detail component According to the component mock-up, the footer has a control that lets users specify the quantity of the selected item they want to add to the shopping cart. The footer also has a button that lets users add the selected item to the shopping cart. 1. Make sure the component file, ProductDetail.mxml, is open in Flex Builder. 2.
6. Insert a NumericStepper control by clicking to the right of the Quantity label in the ControlBar container, clicking the NumericStepper button in the Controls category of the Insert bar, and specifying the following properties in the Attributes panel: qty ■ Common > id: ■ Common > maximum: 100 ■ Common > minimum: 1 ■ Common > stepSize: ■ Common > value: ■ Size > width: 1 1 40 7.
Build the shopping cart component According to the component’s functional specification, the shopping cart component should display the products that the user wants to bring to the checkout area for purchase. The user can delete items from the cart by selecting an item and clicking the Delete button. The user can also proceed to the checkout area by clicking the Checkout button. The following is a mock-up of the component: The shopping cart component does not contain any data in this tutorial.
4. Press Enter to accept your change and close the Quick Tag Editor. 5. Insert a ControlBar container by clicking inside the Panel container and clicking the ControlBar button in the Containers category of the Insert bar. Flex Builder inserts an empty ControlBar container and automatically positions it at the lower edge of the Panel container. 6.
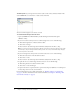
3. Click the Plus (+) button to add a third column, and then set the following options in the DataGrid dialog box: dg ■ ID: ■ Header Text (first row): ■ Header Text (second row): ■ Header Text (third row): Price ■ Column Name (first row): name ■ Column Name (second row): ■ Column Name (third row): Name Qty qty price The DataGrid dialog box should look similar to the following figure: 4. Click OK. Flex Builder inserts a DataGrid component in your component file. 5.
In Design view, the component should look similar to the following figure if you select the Panel container: Note: The component will scale to fit in the space allotted to it in the flexstore.mxml file. Finish the footer of the shopping cart component According to the component mock-up, the footer has one button to let the user delete a selected item in the shopping cart, and another button to let the user proceed to the checkout area.
5. Insert a Label component by clicking to the right of the Checkout button in the ControlBar container, clicking the Label button on the Insert bar, and specifying the values for the following properties in the Attributes panel: Total: $ ■ Common > text: ■ Common > styleName: price 6. Save your work.
1. Open the fbComponents/flexstore.mxml file in Flex Builder. Make sure you open the file located in the fbComponents folder. 2. In Design view, click anywhere inside the ViewStack container in the Product Catalog panel, and select Insert > Local Component. The Insert Local Component dialog box appears: 3. Click the Browse button and select the ThumbnailView component, ThumbnailView.mxml, in the Open dialog box that appears.
Insert the detail and cart components in the layout Two Canvas containers were inserted in the Flex Store layout to position the product detail and shopping cart components. In this part of the tutorial, you insert the two components that you created, ProductDetail.mxml and CartView.mxml, into the Canvas containers. 1. Make sure the flexstore.mxml file is open in Flex Builder. The file is located in the fbComponents folder. 2.
11. Make sure the Flex server is started, and then press F12 to run the flexstore.mxml file in a browser. The file should look similar to the following figure: If the Results panel displays validation errors, carefully retrace the preceding steps. If you get a server error, make sure the testing server is correctly defined in Flex Builder. For more information, see “Define a Flex Builder site” on page 25.
You decide to write an ActionScript function called changeView() that sets the child component of the ViewStack container, which displays when the user clicks one of the buttons. The ViewStack container has two child components: the GridView and the ThumbnailView components that you inserted in it (see “Insert the view components in the Flex Store layout” on page 51). To make your code more readable, you decide to place the ActionScript function in a separate file called flexstore_script.
6. Assign the event handler to the thumbnail view button by clicking anywhere in the first tag in the flexstore.mxml file and setting the following property in the Events panel of the Tag inspector: ■ mouseDown: changeView('thumb') When the user clicks the image, the changeView() function is called. 7. Assign the event handler to the grid view button by clicking anywhere in the second ■ tag and setting the following property in the Events panel: mouseDown: changeView('thumb') 8.
5. Scroll down the Flex Store page and click the grid view button. The click event calls the changeView function in the ActionScript file. Flex Builder does the following: ■ Stops the application’s execution at the breakpoint you set. ■ Switches to Code view and centers on the line with the breakpoint. ■ Displays the Call Stack panel in the Results panel group. 6. Click the Variables tab next to the Call Stack tab and then expand the Locals category.
Tutorial: Binding components to data with Flex Builder This tutorial shows you how to use Flex Builder to visually bind Flex components to data. It also explains how to use the Network Monitor to monitor the data passed between your application and the Flex server. In a real-world situation, the Flex Store application would connect to a backend system to retrieve and display information about the products.
Specify the web service to use The source of the Flex Store product data is a web service that returns an array containing the data. 1. In Flex Builder, open the flexstore.mxml file located in the fbBindings folder (not the fbComponents folder). 2. In the Data panel (Window > Data), click the Plus (+) button, and select Web Service from the pop-up menu. The Add Web Service dialog box appears. 3. Select FlexStoreCatalogWS from the pop-up menu.
6. Expand the tree control in the Data panel to inspect the web service. The catalogWS web service has one method called getList that returns an array. 7. Save the flexstore.mxml file. Bind the web service to a data model A Flex data model provides a convenient way to refer to and manipulate data in Flex applications. For the Flex Store, you decide to create a data model and bind it to the product data returned by the web service. 1. Make sure your flexstore.mxml file is open in Flex Builder. 2.
5. Click Next to go to Step 2. 6. In the left pane in the Add Binding - Step 2 dialog box, select the catalogWS web service. The Flex component containing the data you want to pass to the data model is the web service. 7. In the right pane, expand the tree control, and select result. 8. Click Finish to create the binding. The new binding appears in the Bindings panel. 9. Save your work. Send the web service request You must specify an event that sends a request to the web service for the product data.
3. Save the ActionScript file. 4. Switch to the flexstore.mxml file. 5. In Code view, assign the event handler to the application’s initialize event by locating the tag, and adding the following property (shown in bold type):
5. Click the final WebServer event (onResult) and inspect the information in the right pane. If the application successfully called the web service when it was initialized, then the data for the product catalog should appear in the right pane. Note how the Network Monitor converts the raw data passed between the server and the application into ActionScript. Scroll down to view the catalog data passed to the application.
4. Save the GridView.mxml file. 5. Switch to the flexstore.mxml file. 6. In Code view, locate the tag and add the following property (shown in bold type): You created the dataObject property in step 2 above to pass the catalog data to the component, where it’s used in the DataGrid control (see step 3 above). 7. Save the flexstore.mxml file. 8.
Bind the ThumbnailView component to the data After binding the GridView component to the data, you bind the ThumbnailView component. 1. Open the ThumbnailView.mxml file located in the fbBindings folder. 2. In Code view, enter the following script block after the opening tag to declare a variable called dataObject: var dataObject; By creating a variable called dataObject, you create a property for the component.
• “Retrieve the product selection” on page 67 • “Display the product detail” on page 68 Detect the product in the GridView component The first task is to modify the GridView component so it can detect when a user clicks a product. 1. Open the GridView.mxml file located in the fbBindings folder and enter the following tag after the opening tag: [Event("change")] 2.
Retrieve the product selection After detecting the product selected by the user, you must pass the information from the GridView and ThumbnailView components to the main application. If the user hasn’t selected a product yet, you must specify a default selection. 1. Open the flexstore_script.as file located in the fbBindings folder. 2. Enter the following variable declaration at the top of the page: var selectedItem; You want to use this variable to store the product selected by the user.
Display the product detail After detecting and retrieving the product selection, you can retrieve the product’s data and use it in the ProductDetail component. 1. Open the ProductDetail.mxml file located in the fbBindings folder. 2. In Code view, enter the following code after the opening tag to declare an object variable called dataObject: var dataObject:Object; The variable declaration creates a property of the ProductDetail component.
7. With the To option selected, scroll down and select the text property (it should be selected by default). You want the text property to receive the product name data. 8. Specify the source of the data by clicking the Next button, and then selecting the name element of the dataModel data model, as follows: 9. Click Finish to create the binding. 10.
14. Switch to the flexstore.mxml file and in Code view, locate the tag and add the following property (shown in bold type):
Add products to the shopping cart The product detail view (ProductDetail component) must not only display details about a product, it must let the user do the following tasks: • Specify the quantity of the displayed product the user wants to add to the shopping cart • Add the product and quantity to the shopping cart. You modify the ProductDetail component so that it adds the displayed product and quantity to the shopping cart when the user clicks the Add to Cart button. 1. Switch to the ProductDetail.
1. Open the CartView.mxml file located in the fbBindings folder. 2. In Code view, enter the following code after the opening tag: var dataObject:ShoppingCart; The variable declaration creates a property of the CartView component. You want to use this property in the tag in the flexstore.mxml file to pass the shoppingCart object to the component. 3.
Activate the Delete button The final step in this tutorial is to active the Delete button in the shopping cart area so the user can remove items from the cart. 1. Switch to the CartView.mxml file. 2. In Code view, enter the following function in the tag (shown in bold type): var dataObject:ShoppingCart; function removeItem() { if (dg.selectedIndex!=undefined) dataObject.removeItemAt(dg.selectedIndex); } The function calls the remoteItemAt method of the cart object. 3.
Next steps For more samples and tutorials, see the following websites: • Flex Builder pages on the Macromedia website at www.macromedia.com/go/fb_devcenter/ • Flex Developer Center on the Macromedia website at www.macromedia.
CHAPTER 3 Creating, Coding, and Debugging Flex Files Macromedia Flex applications are made up of plain text files containing MXML and ActionScript code, plus assets such as Flash components (SWC files) and images. The Flex server compiles the MXML and ActionScript files into Macromedia Flash SWF files that can run in Macromedia Flash Player or in a web browser with Flash Player installed.
3. In the Document list, select one of the MXML options or ActionScript, and do one of the following: ■ Click Create. ■ Double-click the item in the Document list. ■ Press Enter. The dialog box closes, and a new MXML or ActionScript file appears in the Document window. 4. Save and name the new file (File > Save).
To view both Code and Design views: 1. Do one of the following: ■ Click the Split button on the Document toolbar. ■ Select View > Code and Design. The code appears in the top pane while a visual representation of the file appears in the bottom pane. 2. To adjust the size of the panes in the Document window, drag the splitter bar to the desired position. The splitter bar is located between the two panes. 3.
To view and edit code in a separate window: • Select Window > Code Inspector. Related topics • “Using the Tag inspector” on page 79 • “Setting code-coloring preferences” on page 80 • “Setting code formatting preferences” on page 81 Using code hints You can use code hints to write MXML or ActionScript more rapidly and efficiently. If you’re working with MXML, the code hints display lists of tags and properties as you type.
Using the Tag inspector You can edit all the properties of an MXML tag in one place—the Tag inspector. You can also use the Tag inspector to apply Flex effects, assign event handlers, and modify any CSS styles applied to the tag. To use the Tag inspector: 1. Click anywhere inside the MXML tag in Code view, or select the component or container in Design view. The properties of the tag appear in the Attributes panel of the Tag inspector (Window > Tag Inspector, or press F9). 2.
Using the Quick Tag Editor You can use the Quick Tag Editor to quickly inspect and edit HTML tags without leaving Design view. To use the Quick Tag Editor: 1. In Design view, double-click any standard MXML component in the file. The Quick Tag Editor appears. Depending on the component you double-clicked, the title, text, or label value in the tag may be highlighted and ready for your changes to help you work even faster. 2. Edit the tag and then press Enter when you’re finished.
The Edit Coloring Scheme dialog box appears. 3. Edit the code-coloring scheme and click OK. For more information, click the Help button in the dialog box. Setting code formatting preferences You can change the look of your code by specifying formatting preferences such as indentation, line length, and the case of tag and property names.
To set code formatting preferences: 1. Select Edit > Preferences > Code Format. T 2. Set your preferences. For more information, click the Help button in the dialog box. Setting code hints preferences You can modify the way code hints work by enabling or disabling automatic tag completion, enabling or disabling code hints, changing the length of the delay before hints are displayed, or changing the type of hints you want to see while working.
To set code hints preferences: 1. Select Edit > Preferences > Code Hints. 2. Set your preferences. For more information, click the Help button in the dialog box. Related topics • “Using code hints” on page 78 Testing and debugging Flex files Flex Builder has several tools to help you test and debug Flex applications, including an MXML validator, an ActionScript debugger, and a network monitor.
Validating MXML Flex Builder can validate MXML and display syntax errors or warnings. Flex Builder automatically validates an MXML file when you perform an action that synchronizes the file, such as switching to Design view, previewing the file, or switching to debug mode. Flex Builder displays any validation errors or warnings in the Validation panel in the Results panel group. You can also validate a file at any time. To validate a file, do one of the following: • • • • Press Shift+F6.
To compile a Flex file to check for errors: 1. Open an MXML application file in Flex Builder. An MXML application file contains an root tag. If you want to compile custom components, insert them in a test application file and compile the file. For more information, see “Inserting controls and containers in an MXML file” on page 117. 2. Compile the file by doing one of the following: ■ ■ Select File > Build.
Running a file You can run MXML files in a stand-alone browser or in the browser embedded in Flex Builder. Note: To set up more than one browser, see “Setting the Preview in Browser Preferences options” in Using Dreamweaver Help. The following is a quick reference, followed by more detailed information: To do this task... Perform this action Run a file in the embedded browser Press F6.
4. If copies of dependent files such as images or other files are not already located on the testing server, select Yes in the Dependent Files dialog box. Flex Builder uploads most dependent files to the testing server. The server compiles the MXML application file using the files on the server. If a dependent file is missing, then the application file may not compile or may not run properly. Note: Flex Builder may not upload all dependent files.
The debugger will only stop at breakpoints set on lines containing the following: • MXML tags containing an ActionScript event handler, such as • ActionScript lines such as those enclosed in an tag or in an AS file Before you start, make sure you correctly defined a Flex testing server for Flex Builder, and that the server is running.
2. If you want, enter one or more traces in the ActionScript and set a breakpoint on the line immediately following the trace. For example, you might enter the following trace (shown in bold type) in your ActionScript file: 5 ... 6 function myFunc() 7 { 8 trace("Inside my function"); 9 btn.label="OK"; 10 } 11 ... If you set a breakpoint at line 9 (btn.label="OK";) and start the debugger, the Output panel should display the item “Inside my function” when Flex Builder stops at the breakpoint. 3.
4. Review the information about the application up to the breakpoint in the Results panels. Flex Builder provides you with the following information: The Variables panel shows the names and values of all variables up to that point. For simple data types, you can edit a value and your change will take effect immediately on the next code step. Curly brackets ({}) denote complex data types.
Debugging applications by monitoring interactions with the server If your Flex application isn’t working as expected, you can use the Network Monitor to look for clues to the problem. When enabled, the Network Monitor monitors and records all data transactions with the server and displays the information in the Results panel.
4. In the Network Monitor panel, click the Enable Flex Network Monitor option. Monitoring interactions with the server Once enabled, the Network Monitor automatically monitors and records interactions with the server. In Flex Builder, these interactions occur when you run or debug a file. Captured events appear in the Network Monitor panel in the Results panel group (Window > Results).
To filter out events: • Click the Filter Settings button in the panel’s sidebar and deselect event types from the pop-up menu. The types of events that you deselected are no longer displayed in the panel. To view them again, select them in the Filter Settings pop-up menu. To clear all the event data in the panel: • Click the Clear Log Data button in the panel’s sidebar.
Saving event data You can save the event data generated by a particular interaction for analysis or printing. To save the event data: • Click the Save button (the diskette) in the panel’s sidebar and save the file to a location on your hard disk. The event data is stored in an XML file.
CHAPTER 4 Building a Flex User Interface Visually You can use Macromedia Flex Builder to build Flex user interfaces for multi-tier enterprise applications. MXML controls and containers are the building blocks of Flex user interfaces. You use containers to position the controls in your user interface.
Customizing the Document window You can customize the Document window in Flex Builder to suit the job at hand or your personal preferences. To work in Design view, do one of the following: • Click the Design button on the Document toolbar. • Select View > Design. • From Code view, press Control+’ (the slanted quotation mark that usually shares the tilde [~] key). You can split the view to work in the visual and coding environments at the same time.
• If you’re tweaking a layout, try working in Design view in Standard mode. This environment provides the highest possible fidelity for your layout (short of compiling and running the file). As such, the environment is well-suited for fine-tuning an MXML layout. You can make small modifications to the size and position of elements by using a combination of the mouse and the Tag inspector. You can select a nested component by clicking its tag in the tag selector at the bottom of the page.
For more information, see “Introducing Containers” and “Using Layout Containers” in Developing Flex Applications Help. Related topics • “Repositioning Flex components” on page 99 • “Resizing Flex components” on page 100 • “Cutting, copying, and pasting Flex components” on page 100 Adding Flex components to the user interface You can visually add MXML controls and Flash components to your user interface. Your ability to position them depends on the layout management rules of the container.
Repositioning Flex components You can visually move MXML and Flash components from one container to another, or within a container. For more information on a container’s layout management rules, see “Using Layout Containers” in Developing Flex Applications Help. To reposition components on a page: 1. Select the component as follows: ■ ■ ■ To select a container, click any of the following: the container’s tab, its border, or any white space in it.
Resizing Flex components You can resize MXML containers and controls visually with your mouse. Note: When you resize a component with this method, Flex Builder sets absolute width and height values. The component will not grow to accommodate its children, nor will it change size when the user resizes the application. To resize an MXML component with the mouse: 1. Select the component by clicking it in the layout or on the tag selector at the bottom of the Document window. 2.
Editing Flex component properties You can visually edit the properties and events of MXML or Flash components in one central location—the Attributes panel. In addition, you can use the Quick Tag Editor to make quick edits to MXML tags without leaving Design view. Note: You cannot edit component properties after you start a debugging session. For more information, see “Debugging ActionScript” on page 87. To edit component properties with the Attributes panel: 1. Click the component in the page.
To edit the properties of a standard MXML component in the Quick Tag Editor: 1. Double-click the component in Design view. The Quick Tag Editor appears. Depending on the component, the title, text, or label value in the tag may be highlighted to help you work even faster. Note: If you double-click a custom component, the component’s file opens in Flex Builder instead. 2. Change the property values in the Quick Tag Editor and then press Enter. To edit the properties of a custom MXML component: 1.
Related topics • “Editing Flex component properties” on page 101 • “Applying effects to Flex components” on page 109 • “Creating MXML component files” on page 121 About CSS styles in Flex You can use CSS styles to modify your Flex user interface more efficiently. As your design evolves, you can add, delete, or change styles, giving you greater freedom to achieve your design goals.
Importing styles from an external CSS file You can import styles defined in an external CSS file by using the source property of the tag. To import styles from an external CSS file: 1. Make sure the CSS file is located in your site root folder or in any of its subfolders. 2. Open the CSS Styles panel (Window > CSS Styles) and click the Attach Style Sheet button at the bottom of the panel. The Attach External Style Sheet dialog box appears. 3.
Creating new CSS styles You can visually create new CSS styles for Flex components. You can define them in an external CSS file or in the MXML file containing the components you want to format. To create new styles: 1. In the CSS Styles panel (Window > CSS Styles), click the New CSS Style button (+) located in the lower right area of the panel. The New CSS Style dialog box appears. 2. Select a selector type. Flex supports class selectors and tag selectors.
Applying a class style to a component You can visually apply internal or external CSS styles to one or more components. Styles defined as class selectors are the only type of styles you can apply. You can’t apply styles defined as tag selectors because these styles are automatically applied to each instance of the specified tag.
Applying an inline style to a component You can use Flex Builder to visually apply inline styles. An example of an inline style is . The color property in this Button tag applies only to this specific Button instance. To apply an inline style to a component: 1. Click the component in the page. 2. In the Tag inspector (Window > Tag Inspector), click the Attributes tab and scroll to the Styles category of properties.
3. Select the applied rule from the left column in the top half of the panel. The bottom half of the panel displays the style properties for the applied rule. 4. Modify the properties in the bottom half of the panel. Press Enter to accept a modified property value and to see how the change affects the component in Design view. Note: If you modify CSS styles in a style sheet used by more than one file, those changes will be reflected in those files as well. 5.
Applying effects to Flex components You can add effects to components. For example, you can cause a TextInput component to bounce slightly when it receives focus, or a Label component to fade in when the user passes the mouse over it. This section describes how to add these kinds of effects.
To add an effect to an MXML component: 1. Select the component in Design view by clicking it on the page or on the tag selector at the bottom of the Document window. 2. Define a trigger for the effect by selecting a CSS property name for the trigger in the Attributes panel of the Tag inspector (Window > Tag Inspector). For example, to define a mouse-over trigger, select the mouseOverEffect property. 3. Associate an effect with the trigger.
To trigger effects from other components: 1. In Design view, select the component that will have the effect. 2. In the Attributes panel (Window > Tag Inspector), make sure an ID value is specified for the component. If the component doesn’t have an ID, you can’t trigger the effect from another component. 3. Select an effect for any of the following effect properties in the Attributes panel: showEffect, hideEffect, moveEffect, or resizeEffect.
Customizing a standard Flex effect The standard effects in Flex may not provide the exact effect that you want. A Fade effect might be too fast or too slow, or a Pause effect might not hold long enough. You can use Flex Builder to help you customize these effects. Note: This feature works only with standard Flex effects applied to MXML components. It does not work with effects applied to ActionScript components or with custom effects. To customize a standard Flex effect: 1.
5. Set the properties of the custom effect tag in the Tag inspector or in the code. The following example creates a new version of the Fade effect called SlowFade, which uses a two-second duration expressed in milliseconds: Flex Builder inserts the following code in your file: For more information, see “Customizing an effect” in Developing Flex Applications Help. 6. Save the file. 7.
3. Click the pencil icon beside the effect name. Flex Builder performs the following tasks: ■ Switches to Split view and selects the custom effect tag in the code ■ Shows the properties of the custom effect in the Tag inspector. 4. Set the properties of the custom effect tag in the Attributes panel or in the code. For more information, see “Customizing an effect” in Developing Flex Applications Help. 5. Save the file.
Related topics • “Editing Flex component properties” on page 101 • “Applying CSS styles to Flex components” on page 102 • “Handling events” in Developing Flex Applications Help Assigning event handlers to components 115
Chapter 4: Building a Flex User Interface Visually
CHAPTER 5 Working with Components An application typically consists of an MXML application file (a file with an parent tag) and one or more components defined in separate MXML, ActionScript, or Macromedia Flash component (SWC) files. You lay out the components in the application file using Macromedia Flex containers. You can use Macromedia Flex Builder to build and extend components for your applications.
Visually inserting components You can visually insert MXML components in MXML files. Flex Builder writes the appropriate code—including the correct namespace—to reference the component. The techniques described in this section work in both Design and Code views. To visually insert a component: 1. Open the parent MXML file in Code view (View > Code) or Design view (View > Design). 2. Click inside an MXML container in the file.
Manually inserting components If you prefer to insert components by hand in Code view, make sure you specify the component namespace. To manually insert a component: 1. Open the parent MXML file in Code view (View > Code) and enter the component tag. For standard Flex components, you can use code hints to work faster. You can also get code hints for custom components if you package them locally or synchronize them from the server.
To specify component namespaces in your code: • Depending on the type and location of the component you want to insert, specify the namespace as follows: Standard Macromedia controls and containers If working with a standard Macromedia control or container, you don’t need to specify a namespace. The namespace for all Macromedia components is http://www.macromedia.com/2003/mxml/ and is specified in the tag.
If the namespace contains several components that you want to insert in the file or if you want to insert several instances of the same custom component in the file, you can specify the namespace once in the Application tag and omit it from each component tag, as follows: PAGE 122Creating an MXML component file You create an MXML component file in the same way that you create any new file. To create a component file: 1. Select File > New to open the New document dialog box, and then double-click one of the component options in the Flex Development category. Flex Builder gives you the option of creating components derived from common container classes. 2. Name the component by selecting File > Save As and naming the file. The filename defines the component name.
6. If the Flex server is running on a remote computer, copy the component file to the application folder on the server. Make sure the application folder structure on the server matches the folder structure on your local computer, and that you copy the file to the same folder on the server. The folder structure on the server determines the component’s namespace. For more information, see “Specifying component namespaces in your code” on page 119.
Creating a component from an existing component You can create a new component from any component in an existing MXML file. Flex Builder creates the new component file based on the component you select. To create a component file from a component in an existing MXML file: 1. In Flex Builder, open an MXML file containing the component you want to use. 2.
For more information, see “Component metadata” in Developing Flex Applications Help. To include the properties of custom components in code hints: 1. Open the MXML or ActionScript component file in Flex Builder. 2. Select File > Package Component. Synchronizing with custom components on the server The Flex Builder authoring environment has a default set of Flex components.
3. Select Site > Update Flex Components. The Update Flex Components dialog box appears. 4. If you want to update the listed component or components, click OK. For more information, click the Help button in the dialog box. Flex Builder integrates a new component in its authoring environment as follows: • The component appears on the Insert bar and in the Insert menu. • In Code view, the component tag appears in the code hints, and all its properties and property types appear in the property code hints.
CHAPTER 6 Working with Data You can use Macromedia Flex Builder to bind Flex components, Flex data models, or Flex data services in order to pass data between them, or between the user interface and the back-end system.
3. In the Bindings panel (Window > Bindings), click the Plus (+) button. The Add Binding - Step 1 dialog box appears. Tip: You can also open the Add Binding dialog box by right-clicking the component in Design view or its tag in Code view, and then selecting Create New Binding from the context menu. 4. Select the second option (“Data Will Flow From”) and then select the property to supply the data.
If you want, you can start with the destination of the binding and then specify the source. Related topics • “Binding a Flex data model to an object” on page 131 • “Binding a Flex data service to an object” on page 137 Editing a binding visually After you create bindings in Flex Builder, you can edit them visually. To edit a binding: 1. Select the bound object in Design view or the Data panel. 2. In the Bindings panel, double-click the binding you want to edit. The Edit Binding dialog box appears. 3.
Related topics • “Data binding in Flex” on page 150 Inserting a Flex data model into the MXML file You can manually insert a Flex data model in an MXML file or you can visually import it. To manually insert a data model into an MXML file: 1. Open the file in Code view (View > Code). 2. Write an tag.
4. Use the Data panel to inspect the data model. You could also hand-code an tag with a source property that specifies an XML file or a URL that returns XML. The following are some examples: Note: If you create a data model with the source property, you will be unable to visually create a binding to the model because the binding destination is in an external file.
4. Select the second option (“Data Will Flow From”) and then select the property of the data model to supply the data. For example, if you want to retrieve an employee name from the data model, select the appropriate name property of the data model. The Binding Source text box displays the binding expression Flex Builder will insert in the code. If you want you can modify the expression. For more information, see “Binding data” in Developing Flex Applications Help. 5. Click Next.
6. Select the destination of the data supplied by the data model. The destination can be the property of a component, a data service, or even another data model. For example, if you have a Label component that you want to use to display the employee name, select the Label component in the left pane and then select the text:String property in the right pane. 7. Click Finish to create the binding. The new binding appears in the Bindings panel. 8.
Passing data to a Flex data model You can create bindings to pass data to data models. For example, you can create a binding to pass user input to a data model. To create a binding to pass data to a data model: 1. Make sure your MXML file contains a component, data model, or data service that can supply data to the data model. For example, your file can have a TextInput component that lets users enter employee information. 2. In the Data panel, select the data model. 3.
6. Select the source of the data passed to the data model. The source can be the property of a component, data service, or even another data model. For example, if you have a TextInput component that lets users enter an employee name, select the TextInput component in the left pane and then select the text:String property in the right pane. If you want, you can modify the binding expression in the Binding Source text box. 7. Click Finish to create the binding.
Working with Flex data services After inserting the components that make up your user interface, (see Chapter 4, “Building a Flex User Interface Visually,” on page 95), you can use Flex data services to bind the user interface to the business layer. A Flex data service acts as a bridge to the business layer. For more information, see “Flex data services” on page 152. After binding a data service to an object in the business layer, you can pass data between them.
HTTP Service inserts a service that lets you retrieve data from an HTTP address. Remote Object inserts a service that lets you access the methods of a Java object. After clicking one of the items, a dialog box appears to let you specify the web service, HTTP service, or Java object you want to use. 3. If you selected Web Service, select a named service from the pop-up menu or enter the URL of a web service’s WSDL file in the text box. For more information, click the Help button on the dialog box. 4.
To create a binding that retrieves data from a data service: 1. Make sure your MXML file contains a component or data model that can accept the data from the data service. For example, your file can have a Label component that will display a temperature received from the data service. 2. In the Data panel, select the data service. To add a data service to the panel, see “Inserting a Flex data service in the MXML file” on page 136. 3. In the Bindings panel (Window > Bindings), click the Plus (+) button.
Flex Builder doesn’t retrieve and display the schema of HTTP services or remote objects, so you’ll need to know the source property of these services in advance and specify it in the Binding Source text box. The Binding Source text box shows the binding expression Flex Builder will insert in the code. For more information, see “Binding data” in Developing Flex Applications Help. 5. Click Next. The Add Binding - Step 2 dialog box appears. 6. Select the destination of the data supplied by the data service.
4. Make sure the first option (“Data Will Flow To”) is selected and then select the property of the data service to receive the data. For example, if you want to pass a zip code entered by a user to a web service, select the appropriate zip code property of the web service’s request object. 5. Click Next. The Add Binding - Step 2 dialog box appears.
6. Select the source of the data passed to the data service. The source can be the property of a component or data model. For example, if you have a TextInput component that lets users enter a zip code, select the TextInput component in the left pane and then select the text:String property in the right pane. If you want, you can modify the binding expression in the Binding Source text box. 7. Click Finish to create the binding. The new binding appears in the Bindings panel. 8.
To create an event handler to call a data service: 1. Make sure your MXML file contains a binding to a data service such as an web service, an HTTP service, or a remote object. The binding must appear in the Bindings panel (Window > Bindings). For more information, see “Working with Flex data services” on page 136. 2. In Flex Builder, select the component that will generate the event to invoke the data service. For example, you can select a Button component for users to click. 3.
Related topics • “Inserting a Flex data service in the MXML file” on page 136 • “Assigning event handlers to components” on page 114 Working with Flex data services 143
Chapter 6: Working with Data
APPENDIX A Basic Flex Concepts This appendix is intended for Macromedia Flex Builder users who are unfamiliar with Flex technology. It explains basic Flex concepts, but not specific development techniques. For more detailed information, see Developing Flex Applications Help.
Typical application development steps You typically develop a Flex application using the following steps: 1. Create an MXML file with the root tag. 2. Add one or more containers. 3. Add controls to a container, such as input fields, buttons, and output fields. 4. Define a data model. 5. Add a web service, HTTP service, or request to a remote object such as a Java object or a Flash Remoting service. 6. Add validation to input data. 7. Add a script to extend a component.
The content between the starting and closing tags defines a Flex application.
To escape an ActionScript block, enclose it within a CDATA block. A CDATA block is an XML technique used to escape character data from the XML parser. The block is created as follows in the code: The parser ignores everything in the CDATA block, including special symbols, strings, and numbers. The Flex compiler can still read and compile the ActionScript in the block.
The following are some of the characteristics of components: Events Application or user actions that require a component response. Events include component creation, mouse actions such as a mouse over, and button clicks. Styles Characteristics such as font, font size, and text alignment. These are the same styles as defined and used with Cascading Style Sheets (CSS). Behaviors Visible or audible changes to the component triggered by an application or user action.
A container has predefined rules to control the layout of its children, including sizing and positioning. Flex defines layout rules to simplify the design and implementation of rich internet applications, while also providing enough flexibility to let you create a diverse set of applications. One advantage to having predefined layout rules is that your users will soon grow accustomed to them.
The following example binds the text property of a TextInput component (the source property) to the text property of a Label component (the destination property) so that text entered in the TextInput component is displayed by the Label component: ... Flex Builder binds data with the curly braces syntax. To understand this syntax, see “Binding data with the curly braces syntax” in Developing Flex Applications Help.
If you hand-code your pages, you can use ActionScript or the tag to define a data model. In general, you should use a tag for simple data structures and ActionScript for more complex structures and client-side business logic. However, Flex Builder only recognizes data models defined with the tag.
A web service is a software system designed to support machine-to-machine interaction over a network. It has an interface described in a machine-processable format called WSDL. Other systems interact with the web service in a manner prescribed by its description. An HTTP service is nothing more than an HTTP request to a URL. The primary purpose of HTTP services is to retrieve XML data from an external source. A remote object is a Java object in the Flex application’s classpath.
Appendix A: Basic Flex Concepts
INDEX A ActionScript about 147 CDATA blocks 148 creating new files 75 debugger 87 language reference 17 ActionScript and MXML API Reference 17 adding effects 109 application file 117 application root folder 11 applying class styles 106 applying inline styles 107 Attributes panel 79, 101 authoring environment 5 B backend systems.
CSS about 103 applying class styles 106 applying inline styles 107 class selectors 103 creating styles 105 deleting styles 108 embedded styles 103 external styles 103 importing stylesheet 104 inline styles 103 modifying styles 107 tag selectors 103 custom components 120 customer support 18 D data models binding to objects 131 defined 151 inserting 130 Data panel 8, 136 data services binding to components 137 defined 152 inserting 136 databases 152 debugging Actionscript debugger 87 compiling files 84 Networ
J Jakarta Tomcat 20 Java objects 153 JRun 4 19 L local component 118 M Macromedia components 120 Macromedia Developer Center 18 Macromedia JRun 4 19 managing files 21 models.
W Watch panel 90 web servers 19 web services, Flex 153 WEB-INF 123, 125 WebLogic 20 WebSphere 20 workspace 5 158 Index