
User Guide

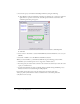
Table Of Contents
- Contents
- Introduction
- Optimizing Content
- Working with Sound
- ActionScript Enhancements for Flash Lite 1.1
- New FSCommand and FSCommand2 commands
- Creating Content
- Testing Content
- Development Kit Examples
- Resources and Support
- Supported ActionScript
- Supported ActionScript Properties
- Warning and Error Messages

Adding sound to your Flash Lite 1.1 application 49
7.
To simulate the user input of a mobile phone, you must disable the keyboard shortcuts (from
the Test Movie window, select Control > Disable keyboard shortcuts). Use the Enter and Tab
keys to interact with the SWF file.
You can now interact with the Flash application. When you click the button in the SWF file, a
browser opens at www.macromedia.com.
8.
Select File > Publish to save the SWF file as FlashLiteTest.swf.
In the mobile phone web browser or from a desktop that can transfer a file using desktop-to-
phone synchronization software, transfer the file to the mobile phone and verify that it works
correctly.
Adding sound to your Flash Lite 1.1 application
You can add sound to your Flash Lite 1.1 application by associating a SMAF sound file with an
ActionScript sound symbol so you can test your SWF file by using the Test Movie command in
Flash MX Professional 2004 Flash.
In the procedure below you will learn how to add sound to a Flash Lite application by embedding
the SMAF sound file birdChirp.mmf, located in the CDK\Tutorials folder, into a Flash Lite 1.1
SWF file.
To associate a SMAF sound file with an ActionScript sound symbol:
1.
In Flash MX Professional 2004, create a new document and name it FlashLiteSound.fla. Save
it in the same directory as birdChirp.mmf (CDK\Tutorials folder).
2.
Select File > Publish Settings and select the Flash tab. In the player version pop-up menu, select
Flash Lite 1.1. Click OK.
3.
From the Property inspector select the Size button, and change your document properties so
that Width = 240, Height = 266, and Frame Rate = 15. Click OK. Make sure to use the
appropriate frame rate on the actual devices.
4.
Select File > Import > Import to Library. Locate the CDK\Tutorials folder and select the
tempAudio.mp3 file. Click OK.
5.
Select Window > Other Panels > Common Libraries > Buttons. Select a button and drag it to
the Stage.
6.
Double-click the new button. The Timeline changes to allow editing of the button and displays
frames named Up, Over, Down, and Hit.
7.
Select Insert > Timeline > Layer to create a new layer. Select Modify > Timeline > Layer
Properties and change the name of the layer to Sound.
8.
Select the Down frame in the Sound layer and insert a keyframe.
9.
Select the testAudio.mp3 file from the Library window and drag it to the keyframe.