
User Guide


<spacer> 445
// Create an XML to UI dialog box using the XML definition in the
// Trace Selections.xml file
var traceSelectionsDlg = fl.getDocumentDOM().xmlPanel( fl.configURI +
"Commands/Trace Selections.xml" );
if (traceSelectionsDlg.dismiss == "accept") {
fl.trace("Checkbox 1: " + traceSelectionsDlg.checkbox1);
fl.trace("Checkbox 2: " + traceSelectionsDlg.checkbox2);
fl.trace("Checkbox 3: " + traceSelectionsDlg.checkbox3);
fl.trace("Checkbox 4: " + traceSelectionsDlg.checkbox4);
fl.trace("Checkbox 5: " + traceSelectionsDlg.checkbox5);
}
Next, create a file named Trace Selections.xml (this example does not use the <spacer/> tag, so
the second row of check box controls are aligned on the left). Place the following code into the file
and save the file:
<dialog id="traceSelections" title="Trace Selections" buttons="accept,
cancel">
<vbox>
<hbox>
<checkbox id="checkbox1" label="checkbox1"/>
<checkbox id="checkbox2" label="checkbox2"/>
<checkbox id="checkbox3" label="checkbox3"/>
</hbox>
<hbox>
<checkbox id="checkbox4" label="checkbox4"/>
<checkbox id="checkbox5" label="checkbox5"/>
</hbox>
</vbox>
</dialog>
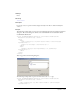
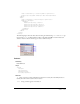
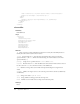
The Trace Selections command now appears on the Commands menu. If you select the
Trace Selections command from the Commands menu, the dialog box defined by Trace
Selections.xml appears, as shown in the following figure:
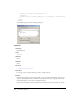
Finally, add the
<spacer/> tag to the Trace Selections.xml file:
<dialog id="traceSelections" title="Trace Selections" buttons="accept,
cancel">
<vbox>
<hbox>
<checkbox id="checkbox1" label="checkbox1"/>
<checkbox id="checkbox2" label="checkbox2"/>
<checkbox id="checkbox3" label="checkbox3"/>
</hbox>
<hbox>
<spacer/>