
User Guide


260 Chapter 14: Data Integration (Flash Professional Only)
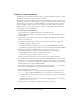
8.
Select Control > Test Movie. Click the Up and Down buttons on component stepper1_nm.
Each time you click the buttons on
stepper1_nm, the value property of stepper1_nm is
copied to the
value property of stepper2_nm. Each time you click the buttons on
stepper2_nm, the value property of stepper2_nm is copied to the value property of
stepper1_nm.
9.
Return to editing the application.
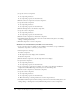
10.
Add another NumericStepper component and name it stepper3_nm.
11.
Add a TextInput component called myInput_txt.
12.
Repeat steps 4-7 and bind the value property of stepper3_nm to the text property of
myInput_txt.
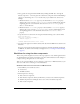
13.
Select Control > Test Movie. Type a number in the text input field, and press Tab.
Each time you enter a new value, the
text property of myInput_txt is copied to the value
property of
stepper3_nm. When you click the Up and Down buttons on stepper3_nm, the
value property of stepper3_nm is copied to the text property of myInput_txt.
For more tutorials that show you how to create data bindings, see www.macromedia.com/devnet/
mx/flash/data_integration.html.
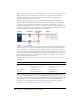
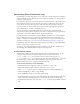
Working with schemas in the Schema tab (Flash Professional only)
The Schema tab in the Component inspector lets you view and edit the schema for each data-
related component in your application. The Schema tab lists the component’s bindable properties,
which are properties to which you can bind that commonly contain dynamic data. All
components have properties, but by default, to reduce UI clutter, the Schema tab shows only
properties that commonly contain dynamic data. (You can, however, bind to any property by
either adding it to the Schema tab or using ActionScript code. For more information, see
“Working with bindings in the Bindings tab (Flash Professional only)” on page 265.)
The Schema tab also lists properties’ data types, their internal structure, and various special
attributes. The data binding engine needs this information for each component to handle your
data correctly.