
User Guide

26 Chapter 2: Creating an Application with Components (Flash Professional Only)
7.
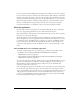
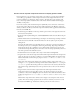
Drag an instance of the Label component from the UI Components folder in the Components
panel onto the Stage. Place it below the Loader component. Set the X, Y coordinates to 5, 145.
Enter price_lbl for the instance name. Click the Parameters tab in the Property inspector. For
autoSize, select left. For html, select true.
The Label component instance will display the price of the product and the price qualifier (the
quantity of products indicated by the specified price, such as “each” or “one dozen.”)
8.
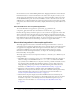
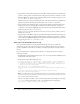
Drag an instance of the NumericStepper component from the UI Components folder in the
Components panel onto the Stage. Place it below the TextArea component. Set the X, Y
coordinates to 135, 145. Enter quantity_ns for the instance name. Click the Parameters tab in
the Property inspector. For
minimum, enter 1.
Setting
minimum to 1 specifies that the user must select at least one of the product in order to
add the item to the cart.
9.
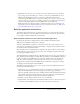
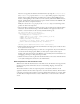
Drag an instance of the Button component from the UI Components folder in the Components
panel onto the Stage. Place it beside the NumericStepper component. Set the X, Y coordinates
to 225, 145. Enter addToCart_button for the instance name. Click the Parameters tab in the
Property inspector. For
label, enter Add To Cart.
Add code to the ProductForm movie clip
Next, you’ll add ActionScript to the ProductForm movie clip that you just created. The
ActionScript populates the components in the movie clip with information about the selected
product, and adds an event listener to the Add to Cart button that adds the selected product to
the cart.
For more information on working with event listeners, see “Using event listeners” in Using
ActionScript in Flash.
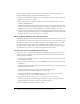
1.
In the Timeline of the ProductForm movie clip, create a new layer and name it Actions. Select
the first frame in the Actions layer.
2.
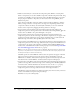
In the Actions panel, add the following code:
// create an object to reference the selected product item in the DataGrid
var thisProduct:Object = this._parent._parent.products_dg.selectedItem;
// populate the description_ta TextArea and price_lbl Label instances with
// data from the selected product
description_ta.text = thisProduct.description;
price_lbl.text = "<b>$"+thisProduct.price+" "+thisProduct.priceQualifier+"</
b>";
// load an image of the product from the application directory
image_ldr.load(thisProduct.image);
Note: The code includes comments explaining its purpose. It’s a good idea to include comments
like these in all the ActionScript code you write, so that you or anyone else going back to the code
later can easily understand what it was for.
First, the code defines a variable to refer to the selected product in the subsequent code. Using
thisProduct means you don’t have to refer to the specified product using the path
this._parent._parent.products_dg.selectedItem.