
User Guide


190 Chapter 6: Creating Interaction with ActionScript
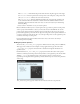
The following procedures show how to create sound controls similar to the ones shown in the
figure.
To attach a sound to a Timeline:
1.
Select File > Import to import a sound.
2.
Select the sound in the library, right-click (Windows) or Control-click (Macintosh), and
select Linkage.
3.
Select Export for ActionScript and Export in First Frame; then give it the identifier
a_thousand_ways.
4.
Add a button to the Stage and name it play_btn.
5.
Add a button to the Stage and name it stop_btn.
6.
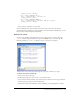
Select Frame 1 in the main Timeline, and select Window > Development Panels > Actions. Add
the following code to the Actions panel:
var song:Sound = new Sound();
song.attachSound("a_thousand_ways");
play_btn.onRelease = function() {
song.start();
};
stop_btn.onRelease = function() {
song.stop();
};
This code first stops the speaker movie clip. It then creates a new Sound object (song) and
attaches the sound whose linkage identifier is
a_thousand_ways. The onRelease event
handlers associated with the
playButton and stopButton objects start and stop the sound
using the
Sound.start() and Sound.stop() methods, and also play and stop the attached
sound.
7.
Select Control > Test Movie to hear the sound.
To create a sliding volume control:
1.
Drag a button to the Stage, and enter knob_btn as the instance name in the Property inspector.
2.
Select the button, and select Modify > Convert to Symbol. Be careful to select the movie
clip behavior.
This creates a movie clip with the button on its first frame.
3.
Select the movie clip, and enter slider_mc as the instance name in the Property inspector.
4.
Select Frame 1 of the main Timeline, and select Window > Development Panels > Actions.
5.
Enter the following code into the Actions panel:
slider_mc.top = slider_mc._y;
slider_mc.bottom = slider_mc._y;
slider_mc.left = slider_mc._x;
slider_mc.right = slider_mc._x+100;
slider_mc._x += 100;