Data Tutorials
Trademarks Add Life to the Web, Afterburner, Aftershock, Andromedia, Allaire, Animation PowerPack, Aria, Attain, Authorware, Authorware Star, Backstage, Bright Tiger, Clustercats, ColdFusion, Contribute, Design In Motion, Director, Dream Templates, Dreamweaver, Drumbeat 2000, EDJE, EJIPT, Extreme 3D, Fireworks, Flash, Flash Lite, Flex, Fontographer, FreeHand, Generator, HomeSite, JFusion, JRun, Kawa, Know Your Site, Knowledge Objects, Knowledge Stream, Knowledge Track, LikeMinds, Lingo, Live Effects, MacRec
CONTENTS Web Service Tutorial: Macromedia Tips (Flash Professional Only) . . . . . . . . . . . . .................................. 5 Connect to a public web service . . . . . . . . . . . . . . . . . . . . . . . . . . . . . . . . . . . . . . . 5 Create a user interface and bind the components with the web service . . . . . . . . . . 7 XML Tutorial: Timesheet (Flash Professional Only) . . . . . . . . . . . . . . . . . . . . . . . . . . . . . . . . . . . . . . . . . . . . . 11 Create the user interface .
Contents
Web Service Tutorial: Macromedia Tips (Flash Professional Only) In this tutorial, you use the Web Services panel to connect to a web service, which you use to return a random tip about Macromedia software. You then use components to set up a simple user interface.
4. Enter the URL http://www.flash-mx.com/mm/tips/tips.cfc?WSDL and click OK. 5. In the Web Services panel, inspect the methods, parameters, and results of the Macromedia Tips web service. The web service has one method, called getTipByProduct. This method accepts a single parameter called product. The parameter is a string that tells the web service what Macromedia product you want to see a tip for. In the next step, you bind this parameter with a ComboBox instance in your application. 6.
. In the Property inspector, enter the instance name tips_wsc. The component is now configured and on the Stage. You can place the component anywhere on or off the Stage—it is invisible when you run the application. Create a user interface and bind the components with the web service Next, you use components to create a simple user interface that you can use to select a product, click a button, and see a random tip about the product.
6. Drag another Label component above the tip_ta TextArea component. In the Property inspector, give it the Instance name tip_lbl and in the text field type Tips. Now add a binding for the WebService connector component from the Macromedia Tip service to ComboBox component that allows the user to choose a product and return a tip about the product. 7. Select the WebServiceConnector component on the Stage. Open the Component inspector, and click the Bindings tab. Click the Add Binding (+) button.
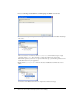
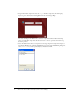
8. In the Component inspector, double-click the empty value in the Bound To field. In the Bound To dialog box, select ComboBox, for the component path and value:String for the schema location. Then click OK. Bound To field in the Component inspector Selecting the component path and schema location in the Bound To dialog box Next, you will bind the results parameter in the web service connector to the TextArea component on the Stage. 9.
. Open the Actions panel and add the following ActionScript on Frame 1 of the Timeline: submit_button.onRelease = function(){ tips_wsc.trigger(); }; 11. Next, add the following ActionScript after the code from step 10. The code uses the dataProvider property to set the items in the ComboBox instance to the contents of the array. products_cb.
XML Tutorial: Timesheet (Flash Professional Only) In this tutorial, you will create an application for editing timesheet data. The timesheet data is stored as XML within a native XML database. The XUpdateResolver component is the best choice for this type of application, because it generates XUpdate statements that can be sent to the server to update the data.
Create the user interface You will begin by creating a user interface, which displays the information in the XML file. 1. Create a new Flash document using Flash MX Professional 2004. Make sure your computer is connected to the Internet. 2. From the Components panel, drag an XMLConnector component to the Stage. In the Property inspector, enter the instance name timeInfo_con. 3. In the Component inspector or the Property inspector, click the Parameters tab. For the URL parameter, enter data.
Note: The XMLConnector component stores information internally as strings. When a request is made for the data through a DataBinding component, you can define how the string data is converted into the correct ActionScript types. This is accomplished by selecting an item within the Schema Tree pane and modifying its settings. 7. Select the Date schema field. Its type is set to String. This is because the Flash authoring tool cannot determine that it is a date type based on its value.
10. Select the @billable schema field. Notice that the field’s data type was automatically set to Boolean by the authoring tool, which looks for certain patterns to guess the type of an XML element. However, you need to modify the Encoder Options for the field. For Boolean data types, the encoder options specify strings that indicate true and false values. 11. With the @billable schema field still selected, double-click the Encoder Options field. 12.
Note: The field names must exactly match the names of their corresponding properties within the XMLConnector component (@date = date, @billable = billable, @duration = duration), including capitalization. 19. Select the Date field that you just created. Select the encoder setting and change it to DateToNumber. Note: The DataSet component needs to store date values in their numeric equivalents so that they can be sorted correctly. This encoder converts a Date into a Number whenever the value is set.
Edit the data Now you will modify the application so that you can edit data through the DataGrid component. 1. On the Stage, select the DataGrid component. Then click the Parameters tab in the Component inspector. 2. Set the editable property to true. 3. Run the application. You can now edit the data within the grid.
XUpdate Tutorial: Update the Timesheet (Flash Professional Only) Prerequisite: “XML Tutorial: Timesheet (Flash Professional Only)” This tutorial starts where the XML tutorial: Timesheet left off. Now that the DataSet component is managing the Data, it is tracking changes that are made to the data into the DeltaPacket. A resolver is needed to send the changes back to the server in an optimized way.
Update the timesheet 1. Begin with the file you created in the “XML Tutorial: Timesheet (Flash Professional Only)” 2. Drag an XUpdateResolver component to the Stage, and in the Property inspector enter the instance name timeInfo_rs. 3. Click the Schema tab in the Component inspector, and select the deltaPacket component property within the Schema Tree pane. 4. Change the DeltaPacket component’s encoder setting to DataSetDeltaToXUpdateDelta.
11. Click the Show Updates button. Review the XML packet in the TextArea component. Tip: You can copy the XML data into your favorite XML editor to make it easier to read. 12. Try setting the includeDeltaPacketInfo parameter of the XUpdateResolver component to true using the Component inspector. Note: Additional information is added to the update packet. This information can be used by the server to uniquely identify this update operation.
XUpdate Tutorial: Update the Timesheet (Flash Professional Only)