FlashPioneer Video Chat Administrator Manual
Contents Welcome .............................................................................................................................. 3 Introduction of Flash Chat.................................................................................................... 4 Installation ............................................................................................................................ 8 System Requirements ............................................................................
Welcome The flash chat is a new mode of chat software which is different from text one. Full of various flashes and funny animation, the flash chat offers an interesting feel of communication online. Based on Flash Media Server and Red5, FlashPioneer Flash Chat supports many systems, which brings convenience to users and saves them a lot of money of global setting. And Flash Chat itself costs less while works excellently.
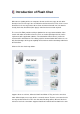
Introduction of Flash Chat When we are chatting online, our computers do not send the messages to each other directly in fact. The messages we send will arrive at Chat Server first. Then it is the server that transfers the messages to the other clients we want to chat with. So, if we want to chat by flash chat, Chat Client (flash player) and Chat Server are both required. The server, like FMS, provides technique platform for message communication, video stream and audio stream.
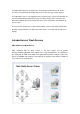
chat room while Client C is in another one. Then Client A or Client B can not see the message sent by Client C. And only Client B can see the message sent by Client A. The information such as users logging in or out, text messages, smiley and animation are transformed into effective data which is then sent to the Server. At the same time, the Client deals with the data received from the Server .Then it transforms the data back to the messages. The Server takes charge of message communication.
WMS (Wowza Media Server) WMS is a Flash server written in Java. As cheap and stable, it is suitable for application of primary and medium enterprises. The customer service and technique support make WMS a good choice for the users who care about the costs and stability.
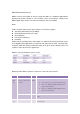
Pro150 $2275 150 concurrent users, unlimited bandwidth, supports streaming video Unlimited Edition $5000 Unlimited concurrent users number and bandwidth (only be restricted to server environment) Red5 0.6 Free Unlimited, the stability for FLV supported by the current edition is not perfect. On the side of customers, FlashPioneer has developed a series of flash chat edition according to FMS and Red5. If you are interested in our products and want to know the information, please go to http://www.
Installation 1) Installation of Server Program Please read the relevant document according to your choice of Flash Server edition installation * Flash Media Server installation in Windows operating system Install Flash Media Server on Windows Install Video Chat Server of FMS Edition * Red5 Server installation in Windows operating system Install Red5 Server on Windows Install Video Chat Server of Red5 Edition * Flash Media Server installation in Linux operating system Install Flash Media Server on Linux Ins
5) For adding PHP database interface, please read Install Chat's database (PHP) PHP Interface description 6) For .NET database interface, please read Install Chat's database (.NET) .
System Requirements FMS Edition Supported Operating Systems Windows 2000 Server Windows 2003 Server, Standard Edition Linux Red Hat Enterprise, Version 3.0 Linux Red Hat Enterprise, Version 4.0 Software Environment Requirements FMS Server 2.0 or a higher Hardware Requirements Minimum Required: X86-compatible CPU (Pentium III, 1 GHz or better) 512 MB available RAM 50 MB of available disk space Recommended: X86-compatible CPU (Pentium 4, 3.
Install Flash Server on Windows ---- Install Flash Media Server 1) Locate the installation file, FlashMediaServer2.exe. This file is on your installation CD, or you may have downloaded it. 2) Double-click the installer icon. The installer launches. 3) Follow the prompts in the installation wizard. 4) Accept the License Agreement to continue the installation process. 5) Enter a user name and password for the first valid server administrator. These values are written to the fms.ini file.
Next, you are suggested to read Install Video Chat Server FMS Edition.
Install Flash Server on Windows ---- Install Red5 Server Download required files Red5 Download the latest Red5 edition (currently is 0.6.3) for Windows. Download page: http://www.osflash.org/red5/red5downloads JDK: Download from the official site. Red5 requires JDK1.5 or a higher version to be used and here it is JDK-1_5_0_11. Download page: http://www.sun.com/download/ Installation Step 1) Install JDK If you have installed JDK, please go to next step.
Add following variables: (Suppose the installation path of Java JDK is D:\jdk.) Add variable PATH and set its value as D:\jdk\bin Add variable CLASSPATH, value .;D:\jdk\lib;D:\jdk\lib\tools.jar;D:\jdk\lib\dt.jar Add variable JAVA_HOME, value D:\jdk Note: Here "." cannot be omitted.
If variable name exists already, edit it and add relevant information. When finishing configuration, we need to test if the JAVA developing environment has been installed successfully or not. Open the command-line window and input command "java" and execute it. If there is no error message that means the installation is successful. If not, please check if you have finished the above steps correctly. 3) Start the installation of Red5. Double-click the downloaded file setup-red5-0.6.2.
Following the wizard, it requires to select a path for JAVA Runtime Environment (JRE). The installation will search for the path automatically, and if it failed, please define one manually.
example: D:\red5. And then select components to install. By default, all items are selected and we do not suggest changing the settings.
There are installation options in "Select Additional Tasks". If you want to set it as system service, pick "Register as service". (Recommended) If you want to "Create a desktop icon", tick the left checkbox. If you want to "Download sample streams", tick the left checkbox. 4) Red5 Configuration Last, pay attention to the system configuration of Red5.
RTMP port is the serving port of Red5 and it is the communication port of server and client. HTTP servlet engine port is the http communication port of Red5 and it is mostly used by administrator. In default situation, no change is needed, unless a default port has already been occupied by other applications. If so, change it to an idle port. (Note: Only port number above 1024 is permitted.) Besides, please pay attention to the notice, the password of Red5 default administrator account is "admin".
After changing port, the new port does not go into effect until the Red5 server is restarted. The whole installation is finished by now. We can find Services program in the "Management Tools" of "Control Panel". Start it, then find Red5. Start up the service, visit http://127.0.0.1:5080/admin, and log in as "admin" and so as the password. If everything is OK, it means Red5 has already worked. Next, you are suggested to read Install Video Chat Server RED5 Edition.
Install Flash Server on Linux ---- Install Flash Media Server Red Hat Linux 1) Log in as a root user (required to install Flash Media Server). 2) Locate the installation file, FlashMediaServer2.tar.gz. This file is on your installation CD, or you may have downloaded it. 3) Copy the file to a directory on your local disk. 4) Open a shell window and switch to the directory with the installation file. 5) Unzip the installation file: unzip flashmediaserver2.tar.
Other Linux System (The following operating processes have been approved in Fedora Core 7 system) The operating processes are the same as the above. Because library "libstdc++.so.5" hasn't been installed in Fedora system, which is an essential for Flash Media Server installation, please install it by using following command before you start the Media Flash Server installation: yum install libstdc++.so.
Last, execute following command to start up FMS. service fms start Next, you are suggested to read Install Video Chat Server FMS Edition.
Install Flash Server on Linux ---- Install Red5 Server Taking Fedora Linux as an example, there are five key steps to install: 1) Install Java 1.5JDK version or above 2) Install Apache Ant 3) Environment variable configuration 4) Install Red5 and compile 5) The system service configuration More details as following: 1) Install Java developing environment Download the latest JDK version of Linux from Sun official website. Here we use the version 1.5.0.
Input command directly through Terminal: export ANT_HOME=/usr/ant export JAVA_HOME=/usr/java export PATH=$PATH:$JAVA_HOME/bin:$ANT_HOME/bin export CLASSPATH=.:$JAVA_HOME/lib/dt.jar:$JAVA_HOME/lib/tools.jar 4) Install Red5 and compile Download the latest version for Linux from the official website, so far it is 0.6.3 Download file name: red5-0.6.3.tar.gz To unzip the file, it's commended to unzip to the directory of /opt/red5.
export JAVA_HOME=/usr/java export PATH=$PATH:$JAVA_HOME/bin:$ANT_HOME/bin export CLASSPATH=.:$JAVA_HOME/lib/dt.jar:$JAVA_HOME/lib/tools.jar exec $JAVA_HOME/bin/java -Djava.security.manager -Djava.security.policy=/opt/red5/conf/red5.policy -cp /opt/red5/red5.jar:conf:/opt/red5/conf org.red5.server.
Execute the command at Terminal as super user: chkconfig --add red5 If it doesn't work, please make sure that the path of command chkconfig is correct. Use the following command to check: Check the installation of chkconfig: rpm –qa|grep chkconfig Chkconfig file path: whereis chkconfig E.g. in Fedora Linux system, the result of performing instruction is as following: $ rpm -qa|grep chkconfig chkconfig-1.3.34-1 $ whereis chkconfig chkconfig: /sbin/chkconfig /usr/share/man/man8/chkconfig.8.
Install Video Chat Server ---- Installation of FMS Edition 1) First make sure you have already installed FMS If not, please see "Install Flash Media Server on Windows", "Install Flash Media Server on Linux" or official online help. 2) Install Video Chat Server FMS Edition Please extract the zipped file firstly. The file should be in the format *.zip on Windows system and *.tar.gz on Linux system.
Install Video Chat Server ---- Installation of Red5 Edition 1) First make sure your Red5 server has already been installed and runs well. If you hasn't install it, please see "Install RED5 Server on Windows" or "Install RED5 Server on Linux". To check if Red5 has been installed successfully, please try visiting http://localhost:5080. Here 5080 port is the default port of Red5 administering background. If you have modified this port, then here should be the modified port.
Install Video Chat Client ---- Installation of Client 1) Unzip file Chat_Client.zip to target folder Below is the file structure after unzip: ./chat.swf ./UserIcons.swf ./setting.xml ./themes/ ./lang/ .
different from the external server's, they can't link when SWF file communicates with the external server. For example, E.g. if SWF is in http://www.aaa.com but the domain name of Red5 or FMS server is www. bbb.com, the SWF can not link to the server. Solution: Place the domain name policy file crossdomain.xml in the web root directory of the server. For e.g. http:// www.bbb.com/crossdomain.xml. It must be the root directory of the web directory. You can find crossdomain.xml on the list of the install file.
Install Video Chat Client ---- Configuration via setting.xml You can download the Chat Configuration Tool that has graphic interface. And this tool requires to install .NET Framework v2.0. You can also choose to configure the Chat Client program by editing the file "setting.xml" directly and manually through notepad or other text editor tools. Here input server's address and port.
zh-TW -- Chinese Traditional The language package is in the directory of /lang/ You can also do translation according to the language package available in the directory. You should save the translation file in the name of language_***.xml into the directory of language package, and then select language. If none language is selected, Client will automatically get the language information of user's operating system, and then to get relevant language package.
Whether show private chat interface If you open private chat interface, click the name in user list then appears a menu including private chat. Through the private chat menu, users can privately chat with someone and the conversation won't be seen by others. If you want to disable the function, set to be "false". Number - The requested rate at which the camera should capture data, fps: in frames per second.
Default is "true". Whether show Underline button in chat toolbar. Whether show Bold button in chat toolbar. Whether show Italic button in chat toolbar. Whether show ColorPicker in chat toolbar. Whether show Select Text Area Background button in chat toolbar. Whether show Smiley button in chat toolbar.
thumb="cartoon/preview/football-small.swf" duration="1.5"/> - PAGE 37
The font panel in chat toolbar. enabled: Whether to show this panel. value: available font size group, separated by "," . defaultSize: default front size.
Install Video Chat Client ---- Creating the Installation Package for Client Program Since version 1.7, Chat provides the function that enables users to create their own client installation file. So the chat users can just log in the chatting system in desktop environment instead of logging in the web site through browser. Moreover, during the installation, users can define skin style and language. All these advantages accelerate a lot the Client’s loading speed and visiting speed.
Install Video Chat Client ---- Custom Skin Default location of interface style package is in directory "theme", and one directory stands for one style. 1. Under directory theme create a new directory, which should be named as the style name to be created. The name can only be composed by numbers, letters and "_", what's more, "_" cannot be placed at the beginning. 2. Copy all the files under directory themes/default into the new directory, including several swf files, theme.xml and color.xml.
Main background Window close button. CLOSE_ON: button status when mouse over; CLOSE_OUT: button status when mouse out. Window minimum button. MIN_ON: button status when mouse over; MIN_OUT: button status when mouse out. Style of common button.
Chat room background and bar Chat tool background Button style of back to lobby Button style of view chat history Online user list background News panel background PAGE 42 Home icon Predefined message background Button for add predefined message Button for delete predefined message Sound panel background PAGE 43Quicker During the creation of SWF file, please pay attention to the following notices: 1. Don't use symbol, please directly draw vector in stage 2. Try your best to keep the size same as original style file. 3. The top left corner coordinate of all the things must locate at (0,0) in the stage. 2) Color.xml, defined global color setting.
List component text color List component background color List component border color List component background color when mouse over List component background color when mouse out Selected item background color Selected ite
Checkbox text color when selected Checkbox background color Checkbox background color when selected Chat text color Text color of chat history when entered room Text link color Text color when mouse over
Upgrade 3 Easy Steps to Upgrade Chat System Note: Please backup all the files before the upgrade so as to avoid losing any important data. 1) Upgrade the server program It is very simple to upgrade the server program, which can be done just by copying and covering. Red5 Edition First stop Red5 service by this command: /sbin/service red5 stop Under the installation folder of Red5, enter the directory webapps/soChat/WEB-INF/lib. Then replace the file soChat.jar with the latest version.
Database Integration Install Chat's database (PHP) There two ways to keep the data. One is using the file format which is the same as the former version, there is no need for users to setup to use, Users' information and chat history are stored under the Chat server path with an encryption; the other is integrating with the present database by PHP interface through which the users' information and chat history store in the database.
level Administrator Register user 3) Install amfphp program Unzip phpService.zip, go into the amfphp_1.2 folder after unzipping, use Notepad or other text editor tools to open "services/flashchat/chatService.php", and modify the code. Find the two lines of code as following: // connect the data server mysql_connect("localhost", "root","root"); // choose the database, if the name of your database is different, please change it // to your database name.
save the setting. PHP Interface Description There is PHP reserved interface. Through this, you can save the chat users' information and chat history into your database on the website. And you also can check the user's identity through the interface. Flash Remoting technology which is based on open source library AMFPHP is used for PHP interface. The following is the usage description: 1) Server Environment Php (php4,php5) + mysql Remoting gateway interface program: Amfphp 1.
function doLogin($username,$pass = null,$isRegister = false){ /* Please put your code here to database connection processing */ return Null/"guest"/"member"/"admin" } doLogin Function must have return value for Red5/FMS to receive, there are four kinds of return value Null: Null, login failed "guest": String, login succeed and login as a guest "member": String, login succeed and login as a register user "admin": String, login succeed and login as an administrator who has the highest purview.
* name. * @ param $ip: The user's IP address * @ param $username: Sending message user's name * @ param $message: Massage content */ function saveChatLog($target,$ip,$username,$message){ /* Please put the code for saving the chat record into the database. */ } The function doesn't need the return value. Explanation: only the administrator enables the function of saving chatting history in the control panel at the background, the function works.
Install Chat's database (.NET) There two ways to keep the data. One is using the file format which is the same as the former version, there is no need for users to setup to use, Users' information and chat history are stored under the Chat server path with an encryption; the other is integrating with the present database by ASP.NET interface through which the users' information and chat history store in the database. 1) First please make sure that your web server supports ASP.
Unzip aspService.zip, go into the Fluorine file after unzipping, use Notepad or other text editor tools to open "Web.config", and modify the code. Find the two lines of code as following: Modify the database server address, database uid and password, database name in sql server as your configuration respectively.
.NET Interface Description There is ASP.net reserved interface. Through this, you can save the chat users' information and chat history into your database on the website. And you also can check the user's identity through the interface. Flash Remoting technology which is based on open source library Fluorine is used for ASP.net interface. The following is the usage description: 1) Server Environment ASP.net + sql server Remoting gateway interface program:Fluorine 2.0.7.
return Null/"guest"/"member"/"admin" } doLogin Function must have return value for Red5/FMS to receive, there are four kinds of return value Null: Null, login failed "guest": String, login succeed and login as a guest "member": String, login succeed and login as a register user "admin": String, login succeed and login as an administrator who has the highest purview. Explanation: doLogin function is the most important, if it is wrong then nobody can login.
*/ public void saveChatLog(string target,string ip,string username,string message){ /* Please put the code for saving the chat record into the database. */ } The function doesn't need the return value. Explanation: only the administrator enables the function of saving chatting history in the control panel at the background, the function works.
Administrator Panel If you login as an administrator, you will see the administer buttons on the top of the panel. By clicking this button, you can enter the general management. You will see another row of buttons for management on the top of the panel. They are: Monitor, Setting, Room, User, News, Account, and Turn back.
Administrator Panel ---- Monitor Here the administrator can see all the user's log in/out information and chat history. There are three buttons at the bottom. Stop: Stop monitoring. When you click the button, all the information (users' log in/out and chat history) won't be recorded. And the button changes into "Start". Re-click the button; you will start the monitoring function again. Clear: Clear all the record including users' log in/out and chat history. Clear Doodle: Clear the doodle immediately.
Administrator Panel ---- Setting There are 8 options on the up part of the panel. If you want to enable the option, just select the square in front of it. And if the function has been started, there will be a mark in the square. Re-click to stop the function and the square showed empty. In the middle, Time Zone is for Chat time zone setting. Clear draw interval is for the doodle. The doodle board will be cleared automatically by the interval you set.
And the rest part is to set the method of storing user information and chat history. You can save them to a file or record them in a database, esp. to integrate with your other database. By default, the option file format is checked. If you want to save the user information and chat history to a remote database, please refer to the article Install Chat's Database and PHP interface description at first. When you finish your setting, click "OK" to save the change.
Administrator Panel ---- Room In this panel, the administrator can add and remove rooms. There are also many settings for the room: Room title --- the administrator can name the room by filling in this blank. Room owner --- room owners are pointed by administrator. And there can be more than one room owners in one chat room. And the room owners' names should be separated by "," without space Max membership --- the user number in the room can be limited by the admin.
Administrator Panel ---- User In this panel, the admin can ban the improper words in user register name or login name. And you also can filter some improper words in the message. So when the user sends a message with a word you have set to be filtered, The word won't be shown in the chat. If you don't want someone has the access of your chat, you can just ban the user by his or her IP. Then the banned user can't login your chat with his or her IP.
Administrator Panel ---- News Here you can set the news on the top of the Chat. And you have choice on which room users can see the broadcast. If you choose Broadcast, the news will be shown scrolling on the bar at the top of Chat window. If you choose a room, then the news will be only shown in the public chat window of that room. TIPS: When the admin edits the broadcast news, the system takes the first line as title. The user can click message in the rolling bar then see the whole message.
Administrator Panel ---- Account Administrator can set the password here.