
User Guide

Display gift details 35
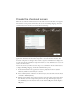
7. Drag an instance of the TextArea component from the User Interface tree in the
Components panel onto the Stage. Place it next to the Loader component. Enter 125, 5
for the x, y coordinates respectively. Enter description_ta for the instance name. Set the
Width to 200 and Height to 130. Click the Parameters tab in the Property inspector. For
editable, select
false. For html, select true. For wordWrap, select true.
The TextArea component instance is used to display a text description of the selected
product. The selected settings specify that the text cannot be edited by a user, that it can
be formatted with HMTL tags, and that lines will wrap to fit the size of the text area.
8. Drag an instance of the Label component from the User Interface tree in the Components
panel onto the Stage. Place it below the Loader component. Set the x, y coordinates to 5,
145. Enter price_lbl for the instance name. Click the Parameters tab in the Property
inspector. For
autoSize, select left. For html, select true.
The Label component instance will display the price of the product and the price qualifier
(the quantity of products indicated by the specified price, such as “each” or “one dozen.”)
9. Drag an instance of the NumericStepper component from the User Interface tree in the
Components panel onto the Stage. Place it below the TextArea component. Set the x, y
coordinates to 135, 145. Enter quantity_ns for the instance name. Click the Parameters
tab in the Property inspector. For
minimum, enter 1.
Setting
minimum to 1 specifies that the user must select at least one of the products in
order to add the item to the cart.
10. Drag an instance of the Button component from the User Interface tree in the Components
panel onto the Stage. Place it beside the NumericStepper component. Set the x, y
coordinates to 225, 145. Enter addToCart_button for the instance name. Click the
Parameters tab in the Property inspector. For
label, enter Add To Cart.