
User Guide


142 Creating Components
To define a movie clip as a component:
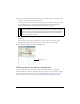
1. Select the movie clip in the library and select Component Definition from the Library
context menu (Windows: Right-click; Mac: control-click).
2. You must enter an AS 2.0 class.
If the class is part of a package, enter the full package name.
3. Specify other options in the Component Definition dialog box, if desired:
■ Click the Plus (+) button to define parameters.
This is optional. The best practice is to use the metadata Inspectable tag in the
component’s class file to specify parameters. When an ActionScript 2.0 class is not
specified, define the parameters for the component here.
■ Specify a custom UI.
This is a SWF file that plays in the Component inspector. You can embed it in the
component FLA file or browse to an external SWF.
■ Specify a live preview.
This is an external or embedded SWF file. You don’t need to specify a live preview
here; you can add a bounding box to the component movie clip, and Flash creates a
live preview for you. See “Creating a component movie clip” on page 138.
■ Enter a description.
The Description field was deprecated in Flash MX 2004 because the Reference panel
has been removed. This field is provided for backward compatibility when you save
FLA files in the Flash MX format.
■ Choose an icon.
This option specifies a PNG file to use as an icon for the component. If you specify an
IconFile metadata tag in the ActionScript 2.0 class file (best practice), this field is
ignored.
■ Select or deselect Parameters Are Locked in Instances.
When this option is unselected, users can add parameters to each component instance
that differ from the component’s parameters. Generally, this setting should be selected.
This option provides backward compatibility with Flash MX.
■ Specify a tooltip that appears in the Components panel.