
User Guide


About themes 111
Creating a new theme
If you don’t want to use the Halo theme or the Sample theme, you can modify one of them to
create a new theme.
Some skins in the themes have a fixed size. You can make them larger or smaller and the
components will automatically resize to match them. Other skins are composed of multiple
pieces, some static and some that stretch.
Some skins (for example, RectBorder and ButtonSkin) use the ActionScript drawing API to
draw their graphics, because it is more efficient in terms of size and performance. You can use
the ActionScript code in those skins as a template to adjust the skins to your needs.
For a list of the skins supported by each component and their properties, see the Components
Language Reference.
To create a new theme:
1. Select the theme FLA file that you want to use as a template, and make a copy.
Give the copy a unique name such as MyTheme.fla.
2. Select File > Open MyTheme.fla in Flash.
3. Select Window > Library to open the library if it isn’t open already.
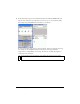
4. Double-click any skin symbol you want to modify to open it in symbol-editing mode.
The skins are located in the Flash UI Components 2/Themes/MMDefault/Component
Assets folder (this example uses RadioButton Assets).
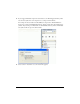
5. Modify the symbol or delete the graphics and create new graphics.
You may need to select View > Zoom In to increase the magnification. When you edit a
skin, you must maintain the registration point in order for the skin to be displayed
correctly. The upper-left corner of all edited symbols must be at (0,0).
For example, open the States/RadioFalseDisabled asset and change the inner circle to a
light gray.
6. When you finish editing the skin symbol, click the Back button at the left side of the
information bar at the top of the Stage to return to document-editing mode.
7. Repeat steps 4-6 until you’ve edited all the skins you want to change.
8. Apply MyTheme.fla to a document by following the steps shown later in this chapter. (See
“Applying a new theme to a document” on page 113.)