
User Guide

About skinning components 101
8. Add ActionScript code to register the skin element or a movie clip instance it contains as a
colored skin element.
For example, add the following code to the skin element’s Timeline.
mx.skins.ColoredSkinElement.setColorStyle(innerCircle,
"symbolBackgroundDisabledColor");
In this example you’re using a color that already corresponds to an existing style name in
the Sample style. Wherever possible, it’s best to use style names corresponding to official
Cascading Style Sheet standards or styles provided by the Halo and Sample themes.
9. Repeat steps 5-8 until you’ve edited all the skins you want to change.
For this example, repeat these steps for the RadioTrueDisabled skin, but instead of
converting the existing graphic to a movie clip, delete the graphic and drag the existing
Inner Circle symbol to the RadioTrueDisabled skin element.
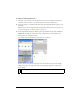
10. When you finish editing the skin symbol, click the Back button at the left side of the
information bar at the top of the Stage to return to document-editing mode.
11. Drag an instance of the component to the Stage.
For this example, drag two RadioButton components to the Stage, set one to selected, and
use ActionScript to set both to disabled in order to see the changes.
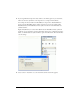
12. Add ActionScript code to the document to set the new style property on the component
instances or at the global level.
For this example, set the property at the global level as follows:
_global.style.setStyle("symbolBackgroundDisabledColor", 0xD9D9D9);
13.
Select Control > Test Movie.
Applying new skins to a component
Once you have created a new skin, you must apply it to a component in a document. You can
use the
createClassObject() method to dynamically create the component instances, or
you can manually place the component instances on the Stage. There are two different ways
to apply skins to component instances, depending on how you add the components to
a document.