
User Guide
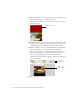
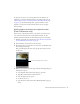
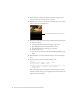
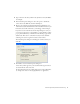
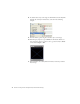
Table Of Contents
- Contents
- Introduction
- Flash Lite Overview
- Hello World Flash Lite application (Flash Professional only)
- Flash Lite authoring features in Flash Professional 8 (Flash Professional only)
- Workflow for authoring Flash Lite applications (Flash Professional only)
- About Flash Lite content types
- Creating a Flash Lite document template (Flash Professional only)
- Tutorial: Creating a Flash Lite Application (Flash Professional Only)
- Cafe application overview (Flash Professional only)
- View the completed application (Flash Professional only)
- Create the application (Flash Professional only)
- Index
40 Tutorial: Creating a Flash Lite Application (Flash Professional Only)
13. Save your work and test the application in the emulator.
14. Select the View Video option on the application’s home screen to view
the video.
Try pausing the video by pressing the right soft key, and pressing the
same key again to resume playback. When the video completes, you
can press the right soft key again to play the video again.
Create the set location screen (Flash
Professional only)
In this section, you’ll create a new screen that lets the user select which of
the four restaurant locations they want to call for reservations. The location
the user selects on this screen determines the number that’s dialed when
they select Reservations on the application’s home screen.
The first time the user starts the application and selects Reservations on the
home screen, the application takes them to the set location screen where
they can select a location. Subsequently, when the user selects Reservations,
the application immediately dials the default restaurant location’s number.
The application uses a shared object to save the location that the user
selected between sessions.
1. In Flash, open the file you completed in “Create the Video screen (Flash
Professional only)” on page 36.
2. In the Timeline, select the keyframe on Frame 66 of the layer named
Options Menu.
3. Open the Library panel (Window > Library), and drag the button
named location_SF_button from the library to the Stage.
Position the button under the text that reads, in part, “Select your
preferred location…”
4. In the Property inspector, type sf_btn in the Instance Name text box.
5. Drag the button named location_SJ_button from the library to the
Stage and position it directly below the location_SF button.
6. In the property inspector, type sj_btn in the Instance Name text box.